Mercurial
Mercurial is a distributed source control management tool.
- Mercurial Website.
- bitbucket.org - Easy repository publishing.
- Hg Init - A very nice Mercurial tutorial for newcomers.
With it you can save snapshots of your work on documents and go back to these at all times.
Also you can easily collaborate with other people and use Mercurial to merge your work.
Someone changes something in text file you also worked on? No problem. If you didn't work on the same line, you can simply let Mercurial do an automatic merge and your work will be joined. (If you worked on the same line you'll need to select how you want to merge these two changes).
It doesn't need a network connection for normal operation, except when you want to push your changes over the internet or pull changes of others from the web, so its commands are fast. The time to do a commit is barely noticeable which makes atomic commits easy to do.
And if you already know subversion, the switch to Mercurial will be mostly painless.
But its most important strength is not its speed. It is that Mercurial just works. No hassle with complicated setup. No arcane commands. Almost everything I ever wanted to do with it just worked out of the box, and that's a rare and precious feature today.
And to answer a common question:
“Once you have learned git well, what use is hg?” — Ross Bartlett in Why Mercurial?
- Easier usage (with git I shot myself in the foot quite often. Mercurial just works),
- Thoroughly planned features and user interface,
- No need to think much about the tool. There is a reason why hg users tend to talk less about hg: There is no need to talk about it that much,
- Accessing both hg and git repos from one ui via hg-git,
- Versioned tags and the option to use persistent branches which make it easier to track later on, why a commit was added,
- And many great extensions which for example enable much better scaling for huge repositories and distributed teams, along with easy paths to evolve.
I wish you much fun with Mercurial!
A complete Mercurial branching strategy
New version: draketo.de/software/mercurial-branching-strategy
This is a complete collaboration model for Mercurial. It shows you all the actions you may need to take, except for the basics already found in other tutorials like
- Mercurial in workflows (official guide, 15 minutes)
- hg init (more graphics and for Windows)
- hg init science (slides 12 to 23)
Adaptions optimize the model for special needs like maintaining multiple releases1, grafting micro-releases and an explicit code review stage.
Summary: 3 simple rules
Any model to be used by people should consist of simple, consistent rules. Programming is complex enough without having to worry about elaborate branching directives. Therefore this model boils down to 3 simple rules:
(1) you do all the work on
default2 - except for hotfixes.(2) on
stableyou only do hotfixes, merges for release3 and tagging for release. Only maintainers4 touch stable.(3) you can use arbitrary feature-branches5, as long as you don’t call them
defaultorstable. They always start at default (since you do all the work on default).
Diagram
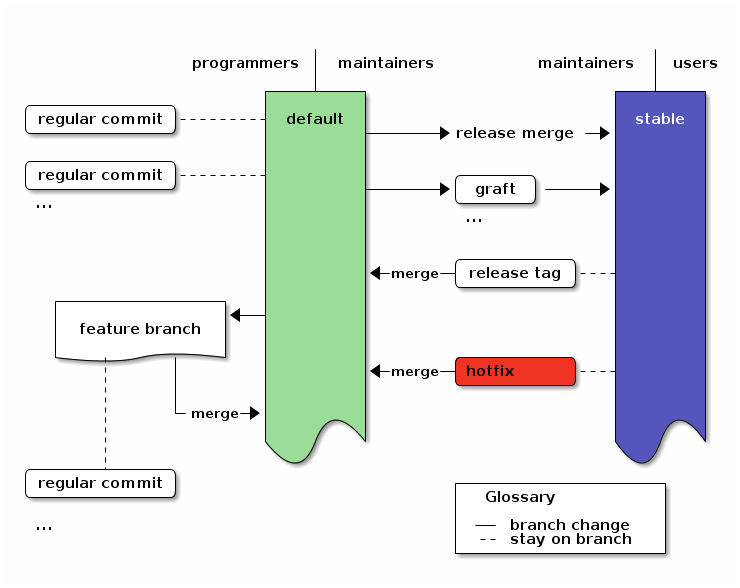
To visualize the structure, here’s a 3-tiered diagram. To the left are the actions of programmers (commits and feature branches) and in the center the tasks for maintainers (release and hotfix). The users to the right just use the stable branch.6
An overview of the branching strategy. Click the image to get the emacs org-mode ditaa-source.

Table of Contents
Practial Actions
Now we can look at all the actions you will ever need to do in this model:7
Regular development
commit changes:
(edit); hg ci -m "message"continue development after a release:
hg update; (edit); hg ci -m "message"
Feature Branches
start a larger feature:
hg branch feature-x; (edit); hg ci -m "message"continue with the feature:
hg update feature-x; (edit); hg ci -m "message"merge the feature:
hg update default; hg merge feature-x; hg ci -m "merged feature x into default"close and merge the feature when you are done:
hg update feature-x; hg ci --close-branch -m "finished feature x"; hg update default; hg merge feature-x; hg ci -m "merged finished feature x into default"
Tasks for Maintainers
-
create the repo:
hg init reponame; cd reponamefirst commit:
(edit); hg ci -m "message"create the stable branch and do the first release:
hg branch stable; hg tag tagname; hg up default; hg merge stable; hg ci -m "merge stable into default: ready for more development"
apply a hotfix8:
hg up stable; (edit); hg ci -m "message"; hg up default; hg merge stable; hg ci -m "merge stable into default: ready for more development"do a release9:
hg up stable; hg merge default; hg ci -m "(description of the main changes since the last release)" ; hg tag tagname; hg up default ; hg merge stable ; hg ci -m "merged stable into default: ready for more development"
-
That’s it. All that follows are a detailed example which goes through all actions one-by-one, adaptions to this workflow and the final summary.
Example
This is the output of a complete example run 10 of the branching model, including all complications you should ever hit.
We start with the full history. In the following sections, we will take it apart to see what the commands do. So just take a glance, take in the basic structure and then move on for the details.
hg log -G
@    changeset:   15:855a230f416f
|\   tag:         tip
| |  parent:      13:e7f11bbc756c
| |  parent:      14:79b616e34057
| |  user:        Arne Babenhauserheide <bab@draketo.de>
| |  date:        Sat Jan 26 15:39:49 2013 +0100
| |  summary:     merged stable into default: ready for more development
| |
| o  changeset:   14:79b616e34057
|/|  branch:      stable
| |  parent:      7:e8b509ebeaa9
| |  parent:      13:e7f11bbc756c
| |  user:        Arne Babenhauserheide <bab@draketo.de>
| |  date:        Sat Jan 26 15:39:48 2013 +0100
| |  summary:     merged default into stable for release
| |
o |    changeset:   13:e7f11bbc756c
|\ \   parent:      11:e77a94df3bfe
| | |  parent:      12:aefc8b3a1df2
| | |  user:        Arne Babenhauserheide <bab@draketo.de>
| | |  date:        Sat Jan 26 15:39:47 2013 +0100
| | |  summary:     merged finished feature x into default
| | |
| o |  changeset:   12:aefc8b3a1df2
| | |  branch:      feature-x
| | |  parent:      9:1dd6209b2a71
| | |  user:        Arne Babenhauserheide <bab@draketo.de>
| | |  date:        Sat Jan 26 15:39:46 2013 +0100
| | |  summary:     finished feature x
| | |
o | |  changeset:   11:e77a94df3bfe
|\| |  parent:      10:8c423bc00eb6
| | |  parent:      9:1dd6209b2a71
| | |  user:        Arne Babenhauserheide <bab@draketo.de>
| | |  date:        Sat Jan 26 15:39:45 2013 +0100
| | |  summary:     merged feature x into default
| | |
o | |  changeset:   10:8c423bc00eb6
| | |  parent:      8:dc61c2731eda
| | |  user:        Arne Babenhauserheide <bab@draketo.de>
| | |  date:        Sat Jan 26 15:39:44 2013 +0100
| | |  summary:     3
| | |
| o |  changeset:   9:1dd6209b2a71
|/ /   branch:      feature-x
| |    user:        Arne Babenhauserheide <bab@draketo.de>
| |    date:        Sat Jan 26 15:39:43 2013 +0100
| |    summary:     x
| |
o |  changeset:   8:dc61c2731eda
|\|  parent:      5:4c57fdadfa26
| |  parent:      7:e8b509ebeaa9
| |  user:        Arne Babenhauserheide <bab@draketo.de>
| |  date:        Sat Jan 26 15:39:43 2013 +0100
| |  summary:     merged stable into default: ready for more development
| |
| o  changeset:   7:e8b509ebeaa9
| |  branch:      stable
| |  user:        Arne Babenhauserheide <bab@draketo.de>
| |  date:        Sat Jan 26 15:39:42 2013 +0100
| |  summary:     Added tag v2 for changeset 089fb0af2801
| |
| o  changeset:   6:089fb0af2801
|/|  branch:      stable
| |  tag:         v2
| |  parent:      4:d987ce9fc7c6
| |  parent:      5:4c57fdadfa26
| |  user:        Arne Babenhauserheide <bab@draketo.de>
| |  date:        Sat Jan 26 15:39:41 2013 +0100
| |  summary:     merge default into stable for release
| |
o |  changeset:   5:4c57fdadfa26
|\|  parent:      3:bc625b0bf090
| |  parent:      4:d987ce9fc7c6
| |  user:        Arne Babenhauserheide <bab@draketo.de>
| |  date:        Sat Jan 26 15:39:40 2013 +0100
| |  summary:     merge stable into default: ready for more development
| |
| o  changeset:   4:d987ce9fc7c6
| |  branch:      stable
| |  parent:      1:a8b7e0472c5b
| |  user:        Arne Babenhauserheide <bab@draketo.de>
| |  date:        Sat Jan 26 15:39:39 2013 +0100
| |  summary:     hotfix
| |
o |  changeset:   3:bc625b0bf090
| |  user:        Arne Babenhauserheide <bab@draketo.de>
| |  date:        Sat Jan 26 15:39:38 2013 +0100
| |  summary:     2
| |
o |  changeset:   2:3e8df435bcb0
|\|  parent:      0:f97ea6e468a1
| |  parent:      1:a8b7e0472c5b
| |  user:        Arne Babenhauserheide <bab@draketo.de>
| |  date:        Sat Jan 26 15:39:38 2013 +0100
| |  summary:     merged stable into default: ready for more development
| |
| o  changeset:   1:a8b7e0472c5b
|/   branch:      stable
|    user:        Arne Babenhauserheide <bab@draketo.de>
|    date:        Sat Jan 26 15:39:36 2013 +0100
|    summary:     Added tag v1 for changeset f97ea6e468a1
|
o  changeset:   0:f97ea6e468a1
   tag:         v1
   user:        Arne Babenhauserheide <bab@draketo.de>
   date:        Sat Jan 26 15:39:36 2013 +0100
   summary:     1
Action by action
Let’s take the log apart to show the actions contributors will do.
Initialize
Initializing and doing the first commit creates the first changeset:
o  changeset:   0:f97ea6e468a1
   tag:         v1
   user:        Arne Babenhauserheide <bab@draketo.de>
   date:        Sat Jan 26 15:39:36 2013 +0100
   summary:     1
Nothing much to see here.
Commands:
hg init test-branch; cd test-branch
(edit); hg ci -m "message"
Stable branch and first release
We add the first tagging commit on the stable branch as release and merge back into default:
o    changeset:   2:3e8df435bcb0
|\   parent:      0:f97ea6e468a1
| |  parent:      1:a8b7e0472c5b
| |  user:        Arne Babenhauserheide <bab@draketo.de>
| |  date:        Sat Jan 26 15:39:38 2013 +0100
| |  summary:     merged stable into default: ready for more development
| |
| o  changeset:   1:a8b7e0472c5b
|/   branch:      stable
|    user:        Arne Babenhauserheide <bab@draketo.de>
|    date:        Sat Jan 26 15:39:36 2013 +0100
|    summary:     Added tag v1 for changeset f97ea6e468a1
|
o  changeset:   0:f97ea6e468a1
   tag:         v1
   user:        Arne Babenhauserheide <bab@draketo.de>
   date:        Sat Jan 26 15:39:36 2013 +0100
   summary:     1
Mind the tag field which is now shown in changeset 0 and the branchname for changeset 1. This is the only release which will ever be on the default branch (because the stable branch only starts to exist after the first commit on it: The commit which adds the tag).
Commands:
hg branch stable
hg tag tagname
hg up default
hg merge stable
hg ci -m "merged stable into default: ready for more development"`
Further development
Now we just chuck along. The one commit shown here could be an arbitrary number of commits.
o    changeset:   3:bc625b0bf090
|    user:        Arne Babenhauserheide <bab@draketo.de>
|    date:        Sat Jan 26 15:39:38 2013 +0100
|    summary:     2
|
o    changeset:   2:3e8df435bcb0
|\   parent:      0:f97ea6e468a1
| |  parent:      1:a8b7e0472c5b
| |  user:        Arne Babenhauserheide <bab@draketo.de>
| |  date:        Sat Jan 26 15:39:38 2013 +0100
| |  summary:     merged stable into default: ready for more development
Commands:
(edit)
hg ci -m "message"
Hotfix
If a hotfix has to be applied to the release out of order, we just update to the stable branch, apply the hotfix and then merge the stable branch into default11. This gives us changesets 4 for the hotfix and 5 for the merge (2 and 3 are shown as reference).
o    changeset:   5:4c57fdadfa26
|\   parent:      3:bc625b0bf090
| |  parent:      4:d987ce9fc7c6
| |  user:        Arne Babenhauserheide <bab@draketo.de>
| |  date:        Sat Jan 26 15:39:40 2013 +0100
| |  summary:     merge stable into default: ready for more development
| |
| o  changeset:   4:d987ce9fc7c6
| |  branch:      stable
| |  parent:      1:a8b7e0472c5b
| |  user:        Arne Babenhauserheide <bab@draketo.de>
| |  date:        Sat Jan 26 15:39:39 2013 +0100
| |  summary:     hotfix
| |
o |  changeset:   3:bc625b0bf090
| |  user:        Arne Babenhauserheide <bab@draketo.de>
| |  date:        Sat Jan 26 15:39:38 2013 +0100
| |  summary:     2
| |
o |  changeset:   2:3e8df435bcb0
|\|  parent:      0:f97ea6e468a1
| |  parent:      1:a8b7e0472c5b
| |  user:        Arne Babenhauserheide <bab@draketo.de>
| |  date:        Sat Jan 26 15:39:38 2013 +0100
| |  summary:     merged stable into default: ready for more development
Commands:
hg up stable
(edit)
hg ci -m "message"
hg up default
hg merge stable
hg ci -m "merge stable into default: ready for more development"
Regular release
To do a regular release, we just merge the default branch into the stable branch and tag the merge. Then we merge stable back into default. This gives us changesets 6 to 812. The commit-message you use for the merge to stable will become the description for your tag, so you should choose a good description instead of “merge default into stable for release”. Userfriendly, simplified release notes would be a good choice.
o    changeset:   8:dc61c2731eda
|\   parent:      5:4c57fdadfa26
| |  parent:      7:e8b509ebeaa9
| |  user:        Arne Babenhauserheide <bab@draketo.de>
| |  date:        Sat Jan 26 15:39:43 2013 +0100
| |  summary:     merged stable into default: ready for more development
| |
| o  changeset:   7:e8b509ebeaa9
| |  branch:      stable
| |  user:        Arne Babenhauserheide <bab@draketo.de>
| |  date:        Sat Jan 26 15:39:42 2013 +0100
| |  summary:     Added tag v2 for changeset 089fb0af2801
| |
| o  changeset:   6:089fb0af2801
|/|  branch:      stable
| |  tag:         v2
| |  parent:      4:d987ce9fc7c6
| |  parent:      5:4c57fdadfa26
| |  user:        Arne Babenhauserheide <bab@draketo.de>
| |  date:        Sat Jan 26 15:39:41 2013 +0100
| |  summary:     merge default into stable for release
| |
o |  changeset:   5:4c57fdadfa26
|\|  parent:      3:bc625b0bf090
| |  parent:      4:d987ce9fc7c6
| |  user:        Arne Babenhauserheide <bab@draketo.de>
| |  date:        Sat Jan 26 15:39:40 2013 +0100
| |  summary:     merge stable into default: ready for more development
Commands:
hg up stable
hg merge default
hg ci -m "merge default into stable for release"
hg tag tagname
hg up default
hg merge stable
hg ci -m "merged stable into default: ready for more development"
Feature branches
Now we want to do some larger development, so we use a feature branch. The one feature-commit shown here (x) could be an arbitrary number of commits, and as long as you stay in your branch, the development of your colleagues will not disturb your own work. Once the feature is finished, we merge it into default. The feature branch gives us changesets 9 to 13 (with 10 being an example for an unrelated intermediate commit on default).
o    changeset:   13:e7f11bbc756c
|\   parent:      11:e77a94df3bfe
| |  parent:      12:aefc8b3a1df2
| |  user:        Arne Babenhauserheide <bab@draketo.de>
| |  date:        Sat Jan 26 15:39:47 2013 +0100
| |  summary:     merged finished feature x into default
| |
| o  changeset:   12:aefc8b3a1df2
| |  branch:      feature-x
| |  parent:      9:1dd6209b2a71
| |  user:        Arne Babenhauserheide <bab@draketo.de>
| |  date:        Sat Jan 26 15:39:46 2013 +0100
| |  summary:     finished feature x
| |
o |  changeset:   11:e77a94df3bfe
|\|  parent:      10:8c423bc00eb6
| |  parent:      9:1dd6209b2a71
| |  user:        Arne Babenhauserheide <bab@draketo.de>
| |  date:        Sat Jan 26 15:39:45 2013 +0100
| |  summary:     merged feature x into default
| |
o |  changeset:   10:8c423bc00eb6
| |  parent:      8:dc61c2731eda
| |  user:        Arne Babenhauserheide <bab@draketo.de>
| |  date:        Sat Jan 26 15:39:44 2013 +0100
| |  summary:     3
| |
| o  changeset:   9:1dd6209b2a71
|/   branch:      feature-x
|    user:        Arne Babenhauserheide <bab@draketo.de>
|    date:        Sat Jan 26 15:39:43 2013 +0100
|    summary:     x
|
o    changeset:   8:dc61c2731eda
|\   parent:      5:4c57fdadfa26
| |  parent:      7:e8b509ebeaa9
| |  user:        Arne Babenhauserheide <bab@draketo.de>
| |  date:        Sat Jan 26 15:39:43 2013 +0100
| |  summary:     merged stable into default: ready for more development
Commands:
Start the feature
hg branch feature-x
(edit)
hg ci -m "message"
Do an intermediate commit on default
hg update default
(edit)
hg ci -m "message"
Continue working on the feature
hg update feature-x
(edit)
hg ci -m "message"
Merge the feature
hg update default
hg merge feature-x
hg ci -m "merged feature x into default"`
Close and merge a finished feature
hg update feature-x
hg ci --close-branch -m "finished feature x"
hg update default; hg merge feature-x
hg ci -m "merged finished feature x into default"
Note: Closing the feature branch hides that branch in the output of hg branches (except when using --closed) to make the repository state lean and simple while still keeping the feature branch information in history. It shows your collegues, that they no longer have to keep the feature in mind as soon as they merge the most recent changes from the default branch into their own feature branches.
Note: To make the final merge of your feature into default easier, you can regularly merge the default branch into the feature branch.
Note: We use feature branches to ensure that new clones start at a revision which other developers can directly use. With bookmarks you could get trapped on a feature-head which might not be merged to default for quite some time. For more reasons, see the bookmarks footnote.
The final action is to have a maintainer do a regular merge of default into stable to reach a state from which we could safely do a release. Since we already showed how to do that, we are finished here.
Adaptions
This realizes the successful Git branching model13 with Mercurial while maintaining one release at any given time.
If you have special needs, this model can easily be extended to fullfill your requirements. Useful extensions include:
- multiple releases - if you need to provide maintenance for multiple releases side-by-side.
- grafted micro-releases - if you need to segment the next big changes into smaller releases while leaving out some potentially risky changes.
- explicit review - if you want to ensure that only reviewed changes can get into a release, while making it possible to leave out some already reviewed changes from the next releases. Review gets decoupled from releasing.
All these extensions are orthogonal, so you can use them together without getting side-effects.
Multiple maintained releases
To use the branching model with multiple simultaneously maintained releases, you only need to change the hotfix procedure: When applying a hotfix, you go back to the old release with hg update tagname, fix there, add a new tag for the fixed release and then update to the next release. There you merge the new fix-release and do the same for all other releases. If the most recent release is not the head of the stable branch, you also merge into stable. Then you merge the stable branch into default, as for a normal hotfix.14
With this merge-chain you don’t need special branches for releases, but all changesets are still clearly recorded. This simplification over git is a direct result of having real anonymous branching in Mercurial.
hg update release-1.0
(edit)
hg ci -m "message"
hg tag release-1.1
hg update release-2.0
hg merge release-1.1
hg ci -m "merged changes from release 1.1"
hg tag release-2.1
… and so on
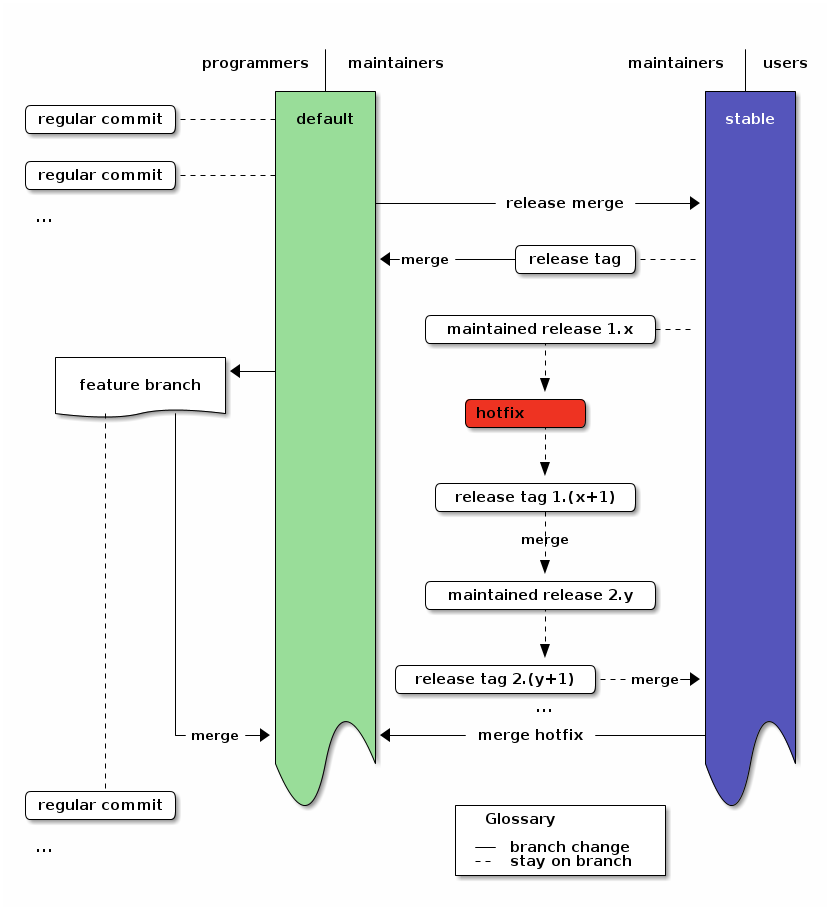
In the Diagram this just adds a merge path from the hotfix to the still maintained releases. Note that nothing changed in the workflow of programmers.
An overview of the branching strategy with maintained releases. Click the image to get the emacs org-mode ditaa-source.

Graft changes into micro-releases
If you need to test parts of the current development in small chunks, you can graft micro releases. In that case, just update to stable and merge the first revision from default, whose child you do not want, and graft later changes15.
Example for the first time you use micro-releases16:
You have changes 1, 2, 3, 4 and 5 on default. First you want to create a release which contains 1 and 4, but not 2, 3 or 5.
hg update 1
hg branch stable
hg graft 4
As usual tag the release and merge stable back into default:
hg tag rel-14
hg update default
hg merge stable
hg commit -m "merge stable into default. ready for more development"
Example for the second and subsequent releases:
Now you want to release the change 2 and 5, but you’re still not ready to release 3. So you merge 2 and graft 5.
hg update stable
hg merge 2
hg commit -m "merge all changes until 2 from default"
hg graft 5
As usual tag the release and finally merge stable back into default:
hg tag rel-1245
hg update default
hg merge stable
hg commit -m "merge stable into default. ready for more development"
The history now looks like this17:
@    merge stable into default. ready for more development (default)
|\
| o  Added tag rel-1245 for changeset 4e889731c6ca (stable)
| |
| o  5 (stable)
| |
| o    merge all changes until 2 from default (stable)
| |\
o---+  merge stable into default. ready for more development (default)
| | |
| | o  Added tag rel-14 for changeset cc2c95dd3f27 (stable)
| | |
| | o  4 (stable)
| | |
o | |  5 (default)
| | |
o | |  4 (default)
| | |
o | |  3 (default)
|/ /
o /  2 (default)
|/
o  1 (default)
|
o  0 (default)
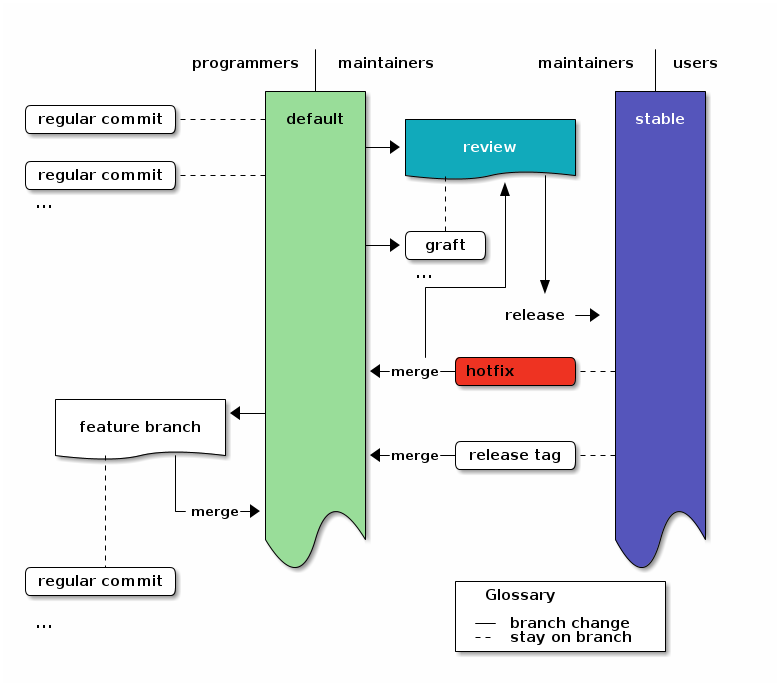
In the Diagram this just adds graft commits to stable:
An overview of the branching strategy with grafted micro-releases. Click the image to get the emacs org-mode ditaa-source.
Grafted micro-releases add another layer between development and releases. They can be necessary in cases where testing requires actually deploying a release, as for example in Freenet.
Explicit review branch
If you want to add a separate review stage, you can use a review branch1819 into which you only merge or graft reviewed changes. The review branch then acts as a staging area for all changes which might go into a release.
To use this extension of the branching model, just create a branch on default called review in which you merge or graft reviewed changes. The first time you do that, you update to the first commit whose children you do not want to include. Then create the review branch with hg branch review and use hg graft REV to pull in all changes you want to include.
On subsequent reviews, you just update to review with hg update nextrelease, merge the first revision which has a child you do not want with hg merge REV and graft additional later changes with hg graft REV as you would do it for micro-releases..
In both cases you create the release by merging the review branch into stable.
A special condition when using a review branch is that you always have to merge hotfixes into the review branch, too, because the review branch does not automatically contain all changes from the default branch.
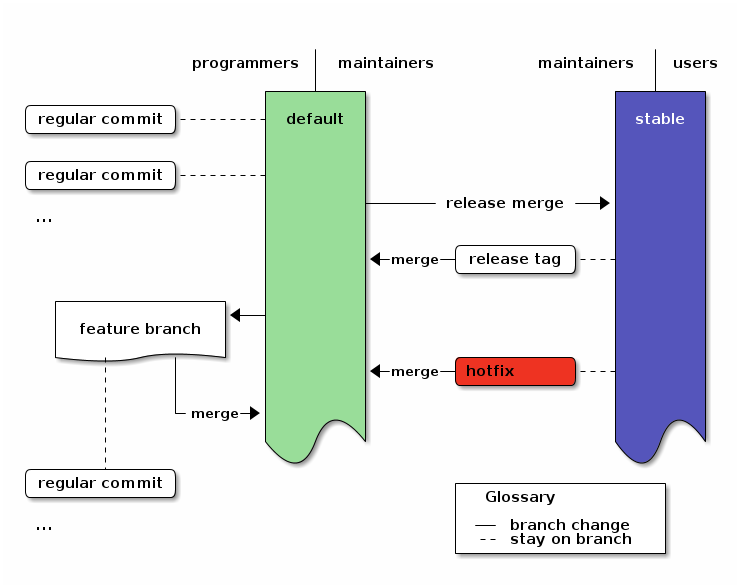
In the Diagram this just adds the review branch between default and stable instead of the release merge. Also it adds the hotfix merge to the review branch.
An overview of the branching strategy with areviewbranch. Click the image to get the emacs org-mode ditaa-source.

Frequently Asked Questions (FAQ)
Where does QA (Quality Assurance) come in?
In the default flow when the users directly use the stable branch you do QA on the default branch before merging to stable. QA is a part of the maintainers job, there.
If your users want external QA, that QA is done for revisions on the stable branch. It is restricted to signing good revisions. Any changes have to be done on the default branch - except for hotfixes for previously signed releases. It is only a hotfix, if your users could already be running a broken version.
There is also an extension with an explicit review branch. There QA is done on the review branch.
Simple Summary
This realizes the successful Git branching model with Mercurial.
We now have nice graphs, examples, potential extensions and so on. But since this strategy uses Mercurial instead of git, we don’t actually need all the graphics, descriptions and branch categories in the git version - or in this post.
Instead we can boil all of this down to 3 simple rules:
(1) you do all the work on
default- except for hotfixes.(2) on
stableyou only do hotfixes, merges for release and tagging for release. Only maintainers touch stable.(3) you can use arbitrary feature-branches, as long as you don’t call them
defaultorstable. They always start at default (since you do all the work on default).
They are the rules you already know from the starting summary. Keep them in mind and you’re good to go. And when you’re doing regular development, there is only one rule to remember:
You do all the work on default.
That’s it. Happy hacking!
-
if you need to maintain multiple very different releases simultanously, see ⁰ or 20 for adaptions ↩
-
defaultis the default branch. That’s the named branch you use when you don’t explicitely set a branch. Its alias is the empty string, so if no branch is shown in the log (hg log), you’re on the default branch. Thanks to John for asking! ↩ -
If you want to release the changes from
defaultin smaller chunks, you can also graft specific changes into a release preparation branch and merge that instead of directly merging default into stable. This can be useful to get real-life testing of the distinct parts. For details see the extension Graft changes into micro-releases. ↩ -
Maintainers are those who do releases, while they do a release. At any other time, they follow the same patterns as everyone else. If the release tasks seem a bit long, keep in mind that you only need them when you do the release. Their goal is to make regular development as easy as possible, so you can tell your non-releasing colleagues “just work on default and everything will be fine”. ↩
-
This model does not use bookmarks, because they don’t offer benefits which outweight the cost of introducing another concept: If you use bookmarks for differenciating lines of development, you have to define the canonical revision to clone by setting the
@bookmark. For local work and small features, bookmarks can be used quite well, though, and since this model does not define their use, it also does not limit it.
Additionally bookmarks could be useful for feature branches, if you use many of them (in that case reusing names is a real danger and not just a rare annoyance) or if you use release branches:
“What are people working on right now?” →hg bookmarks
“Which lines of development do we have in the project?” →hg branches↩ -
Those users who want external verification can restrict themselves to the tagged releases - potentially GPG signed by trusted 3rd-party reviewers. GPG signatures are treated like hotfixes: reviewers sign on stable (via
hg signwithout options) and merge into default. Signing directly on stable reduces the possibility of signing the wrong revision. ↩ -
hg pullandhg pushto transfer changes andhg mergewhen you have multiple heads on one branch are implied in the actions: you can use any kind of repository structure and synchronization scheme. The practical actions only assume that you synchronize your repositories with the other contributors at some point. ↩ -
Here a hotfix is defined as a fix which must be applied quickly out-of-order, for example to fix a security hole. It prompts a bugfix-release which only contains already stable and tested changes plus the hotfix. ↩
-
If your project needs a certain release preparation phase (like translations), then you can simply assign a task branch. Instead of merging to stable, you merge to the task branch, and once the task is done, you merge the task branch to stable. An Example: Assume that you need to update translations before you release anything. (next part: init: you only need this once) When you want to do the first release which needs to be translated, you update to the revision from which you want to make the release and create the “translation” branch:
hg update default; hg branch translation; hg commit -m "prepared the translation branch". All translators now update to the translation branch and do the translations. Then you merge it into stable:hg update stable; hg merge translation; hg ci -m "merged translated source for release". After the release you merge stable back into default as usual. (regular releases) If you want to start translating the next time, you just merge the revision to release into the translation branch:hg update translation; hg merge default; hg commit -m "prepared translation branch". Afterwards you merge “translation” into stable and proceed as usual. ↩ -
To run the example and check the output yourself, just copy-paste the following your shell:
LC_ALL=C sh -c 'hg init test-branch; cd test-branch; echo 1 > 1; hg ci -Am 1; hg branch stable; hg tag v1 ; hg up default; hg merge stable; hg ci -m "merged stable into default: ready for more development"; echo 2 > 2; hg ci -Am 2; hg up stable; echo 1.1 > 1; hg ci -Am hotfix; hg up default; hg merge stable; hg ci -m "merge stable into default: ready for more development"; hg up stable; hg merge default; hg ci -m "merge default into stable for release" ; hg tag v2; hg up default ; hg merge stable ; hg ci -m "merged stable into default: ready for more development" ; hg branch feature-x; echo x > x ; hg ci -Am x; hg up default; echo 3 > 3; hg ci -Am 3; hg merge feature-x; hg ci -m "merged feature x into default"; hg update feature-x; hg ci --close-branch -m "finished feature x"; hg update default; hg merge feature-x; hg ci -m "merged finished feature x into default"; hg up stable ; hg merge default; hg ci -m "merged default into stable for release"; hg up default; hg merge stable ; hg ci -m "merged stable into default: ready for more development"; hg log -G'↩ -
We merge the hotfix into default to define the relevance of the fix for general development. If the hotfix also affects the current line of development, we keep its changes in the merge. If the current line of development does not need the hotfix, we discard its changes in the merge. We do this to ensure that it is clear in future how to treat the hotfix when merging new changes: let the merge record the decision. ↩
-
We can also merge to stable regularly as soon as some set of changes is considered stable, but without making an actual release (==tagging). That way we always have a stable branch which people can test without having to create releases right away. The releases are those changesets on the stable branch which carry a tag. ↩
-
If you look at the Git branching model which inspired this Mercurial branching model, you’ll note that its diagram is a lot more complex than the diagram of this Mercurial version.
The reason for that is the more expressive history model of Mercurial. In short: The git version has 5 types of branches: feature, develop, release, hotfix and master (for tagging). With Mercurial you can reduce them to 3: default, stable and feature branches:
- Tags are simple in-history objets, so we need no special branch for them: a tag signifies a release (down to 4 branch-types - and no more duplication of information, since in the git-model a release is shown by a tag and a merge to master).
- Hotfixes are simple commits on
stablefollowed by a merge todefault, so we also need no branch for them (down to 3 branch-types). And if we only maintain one release at a time, we only need one branch for them: stable (down from branch-type to single branch). - And feature branches are not required for clean separation since mercurial can easily cope with multiple heads in a branch, so developers only have to worry about them if they want to use them (down to 2 mandatory branches).
- And since the default branch is the branch to which you update automatically when you clone a repository, new developers don’t have to worry about branches at all.
So we get down from 5 mandatory branches (2 of them are categories containing multiple branches) to 2 simple branches without losing functionality.
And new developers only need to know two things about our branching model to contribute:
“If you use feature branches, don’t call them
defaultorstable. And don’t touchstable”. -
Merging old releases into new ones sounds like a lot of work. If you get that feeling, then have a look how many releases you really maintain right now. In my Gentoo tree most programs actually have only one single release, so using actual release branches would incur an additional burden without adding real value. You can also look at the rule of thumb whether to choose feature branches instead ↩
-
If you want to make sure that every changeset on
stableis production-ready, you can also start a new release-branch on stable, then merge the first revision, whose child you do not want, into that branch and graft additional changes. Then close the branch and merge it into stable. You can achieve the same with much lower overhead (unneeded complexity) by changing the requirement to “every tagged revision onstableis production-ready”. To only see tagged revisions on stable, just usehg log -r "branch(stable) and tag()". This also works for incoming and outgoing, so you can use it for triggering a build system. ↩ -
To test this workflow yourself, just create the test repository with
hg init 12345; cd 12345; for i in {0..5}; do echo $i > $i; hg ci -Am $i; done. ↩ -
The short graphlog for the grafted micro-releases was created via
hg glog --template "{desc} ({branch})". ↩ -
The review branch is a special preparation-branch, because it can get discontinous changes, if maintainers decide to graft some changes which have ancestors they did not review yet. ↩
-
We use one single review branch which gets reused at every review to ensure that there are no changes in stable which we did not have in the review. As alternative, you could use one branch per review. In that case, ensure that you start the review-* branches from
stableand not fromdefault. Then merge and graft the changes from default which you want to review for inclusion in your next release. ↩ -
If you want to adapt the model to multiple very distinct releases, simply add multiple release-branches (i.e.
release-x). Thenhg graftthe changes you want to use from default or stable into the releases and merge the releases into stable to ensure that the relationship of their changes to current changes is clear, recorded and will be applied automatically by Mercurial in future merges21. If you use multiple tagged releases, you need to merge the releases into each other in order - starting from the oldest and finishing by merging the most recent one into stable - to record the same information as with release branches. Additionally it is considered impolite to other developers to keep multiple heads in one branch, because with multiple heads other developers do not know the canonical tip of the branch which they should use to make their changes - or in case of stable, which head they should merge to for preparing the next release. That’s why you are likely better off creating a branch per release, if you want to maintain many very different releases for a long time. If you only use tags on stable for releases, you need one merge per maintained release to create a bugfix version of one old release. By adding release branches, you reduce that overhead to one single merge to stable per affected release by stating clearly, that changes to old versions should never affect new versions, except if those changes are explicitely merged into the new versions. If the bugfix affects all releases, release branches require two times as many actions as tagged releases, though: You need to graft the bugfix into every release and merge the release into stable.22 ↩ -
If for example you want to ignore that change to an old release for new releases, you simply merge the old release into stable and use
hg revert --all -r stablebefore committing the merge. ↩ -
A rule of thumb for deciding between tagged releases and release branches is: If you only have a few releases you maintain at the same time, use tagged releases. If you expect that most bugfixes will apply to all releases, starting with some old release, just use tagged releases. If bugfixes will only apply to one release and the current development, use tagged releases and merge hotfixes only to stable. If most bugfixes will only apply to one release and not to the current development, use release branches. ↩
| Anhang | Größe |
|---|---|
| hgbranchingoverview.png | 28.75 KB |
| hgbranchinggraft.png | 29.36 KB |
| hgbranchingreview.png | 35.6 KB |
| 2012-09-03-Mo-hg-branching-diagrams.org | 12.43 KB |
| hgbranchingmaintain.png | 45.08 KB |
| 2012-09-03-Mo-hg-branching-diagrams.org | 10.74 KB |
A short introduction to Mercurial with TortoiseHG (GNU/Linux and Windows)
Note: This tutorial is for the old TortoiseHG (with gtk interface). The new one works a bit differently (and uses Qt). See the official quick start guide. The right-click menus should still work similar to the ones described here, though.
Downloading the Repository
After installing TortoiseHG, you can download a repository to your computer by right-clicking in a folder and selecting the menu "TortoiseHG" and then "Clone" in there (currently you still need Windows for that - all other dialogs can be evoked in GNU/Linux on the commandline via "hgtk").
Right-Click menu, Windows:

Create Clone, GNU/Linux:
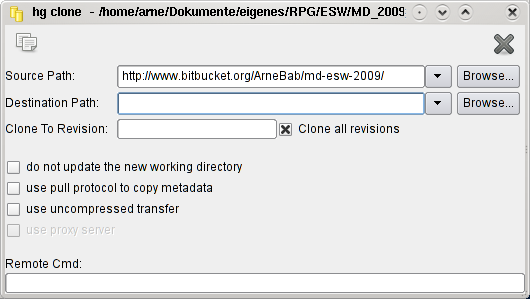
In the dialog you just enter the url of the repository, for example:
http://www.bitbucket.org/ArneBab/md-esw-2009
(that's also the address of the repository in the internet - just try clicking the link.
When you log in to bitbucket.org you will find a clone-address directly on the site. You can also use that clone address to upload changes (it contains your login-name, and I can give you "push" access on that site).
Workflow with TortoiseHG
This gives you two basic abilities:
- Save and view changes locally, and
- synchronize changes with others.
(I assume that part of what I say is redundant, but I'd rather write a bit too much than omit a crucial bit)
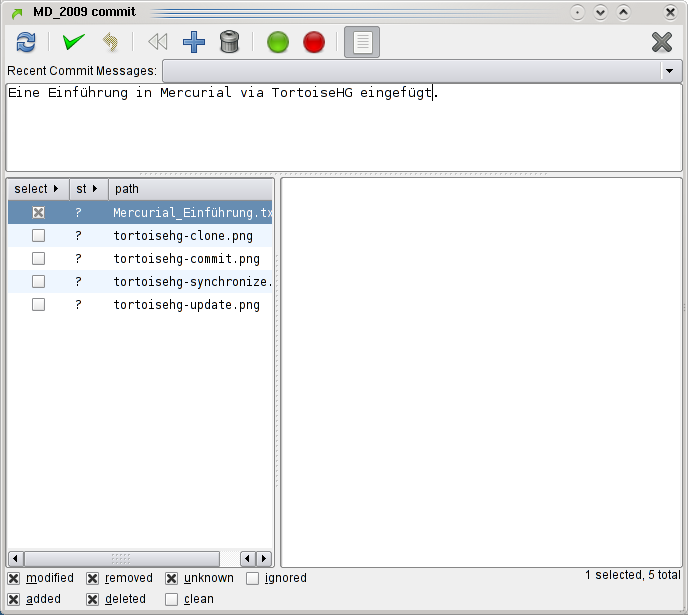
To save changes, you can simlply select "HG Commit" in the right-click-menu. If some of your files aren't known to HG yet (the box before the file isn't ticked), you have to add them (tick the box) to be able to commit them.
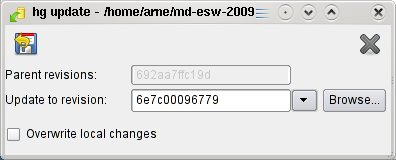
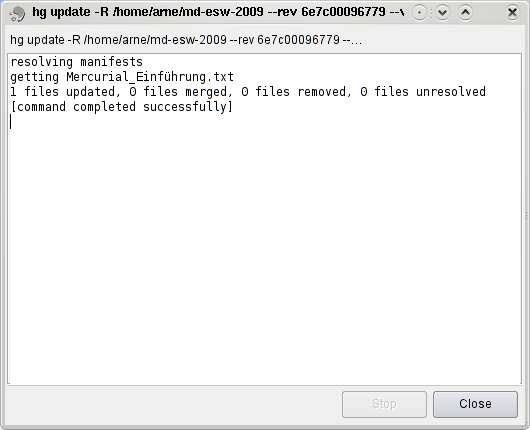
To go back to earlier changes, you can use "Checkout Revision" in the "TortoiseHG" menu. In that dialog you can then select the revision you want to see and use the icon on the upper left to get all files to that revision.
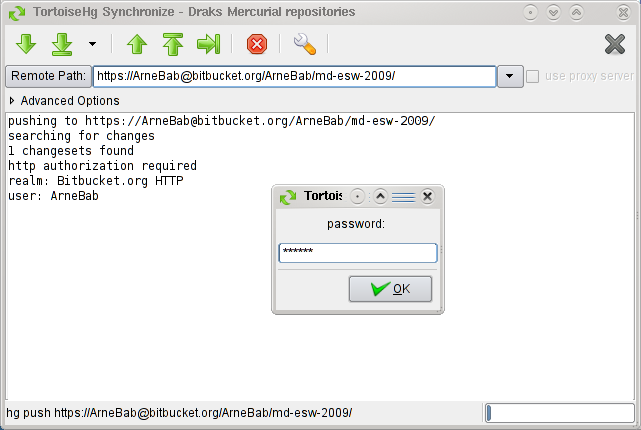
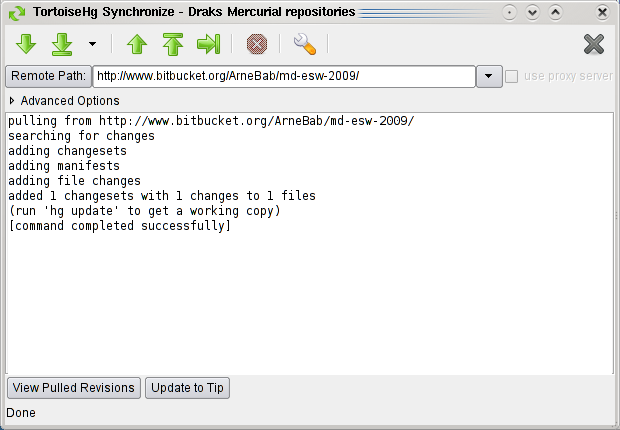
You can synchronize by right-clicking in the folder and selecting "Synchronize" in the "TortoiseHG" menu (inside the right-click menu). In the opening dialog you can "push" (upload changes - arrow up with the bar above it), "pull" (download changes to your computer - arrow down with bar below), and check what you would pull or push (arrows iwthout bars). I thing that using dialog will soon became second nature for you, too :)
Have fun with TortoiseHG! :) - Arne
PS: There's also a longer intro to TortoiseHG and an overview to DVCS.
PPS: md-esw-2009 is a repository in which Baddok and I planned a dual-gm roleplaying session Mechanical Dream.
PPPS: There's also a german version of this article on my german pages.
Basic usecases for DVCS: Workflow Failures
If you came here searching for a way to set the username in Mercurial: just run
hg config --editand add
[ui]
username = YOURNAME <EMAIL>
to the file which gets opened. If you have a very old version of Mercurial (<3.0), open$HOME/.hgrcmanually.Update (2015-02-05): For the Git breakage there is now a partial solution in Git v2.3.0: You can push into a checked out branch when you prepare the target repo via
git config receive.denyCurrentBranch updateInstead, but only if nothing was changed there. This does not fully address the workflow breakage (the success of the operation is still state-dependent), but at least it makes it work. With Git providing a partial solution for the breakage I reported and Mercurial providing a full solution since 2014-05-01, I call this blog post a success. Thank you Git and Mercurial devs!Update (2014-05-01): The Mercurial breakage is fixed in Mercurial 3.0: When you commit without username it now says “Abort: no username supplied (use "hg config --edit" to set your username)”. The editor shows a template with a commented-out field for the username. Just put your name and email after the pre-filled
username =and save the file. The Git breakage still exists.Update (2013-04-18): In #mercurial @ irc.freenode.net there were discussions yesterday for improving the help output if you do not have your username setup, yet.
1 Intro
I recently tried contributing to a new project again, and I was quite surprised which hurdles can be in your way, when you did not setup your environment, yet.
So I decided to put together a small test for the basic workflow: Cloning a project, doing and testing a change and pushing it back.
I did that for Git and Mercurial, because both break at different points.
I’ll express the basic usecase in Subversion:
- svn checkout [project]
- (hack, test, repeat)
- (request commit rights)
- svn commit -m "added X"
You can also replace the request for commit rights with creating a patch and sending it to a mailing list. But let’s take the easiest case of a new contributor who is directly welcomed into the project as trusted committer.

A slightly more advanced workflow adds testing in a clean tree. In Subversion it looks almost like the simple commit:

Table of Contents
2Git
Let’s start with Linus’ DVCS. And since we’re using a DVCS, let’s also try it out in real life
2.1 Setup the test
LC_ALL=C
LANG=C
PS1="$"
rm -rf /tmp/gitflow > /dev/null
mkdir -p /tmp/gitflow > /dev/null
cd /tmp/gitflow > /dev/null
# init the repo
git init orig  > /dev/null
cd orig > /dev/null
echo 1 > 1
# add a commit
git add 1 > /dev/null
git config user.name upstream > /dev/null
git config user.email up@stream > /dev/null
git commit -m 1 > /dev/null
# checkout another branch but master. YES, YOU SHOULD DO THAT on the shared repo. We’ll see later, why.
git checkout -b never-pull-this-temporary-useless-branch master 2> /dev/null
cd .. > /dev/null
echo # purely cosmetic and implementation detail: this adds a new line to the output
ls
wolf, n.:
    A man who knows all the ankles.
arne@fluss ~/.emacs.d/private/journal $ arne@fluss ~/.emacs.d/private/journal $ $$$$$$$$$$$$$$$$
orig
git --version
git version 1.8.1.5
2.2 Simplest case
2.2.1 Get the repo
First I get the repo
git clone orig mine
echo $ ls
ls
Cloning into 'mine'...
done.
$ ls
mine  orig
2.2.2 Hack a bit
cd mine
echo 2 > 1
git commit -m "hack"
$# On branch master
Changes not staged for commit:
(use "git add <file>..." to update what will be committed)
(use "git checkout -- <file>..." to discard changes in working directory)

modified:   1
no changes added to commit (use "git add" and/or "git commit -a")
ARGL… but let’s paste the commands into the shell. I do not use –global, since I do not want to shoot my test environment here.
git config user.name "contributor"
git config user.email "con@tribut.or"
and try again
git commit -m "hack"
On branch master
Changes not staged for commit:
(use "git add <file>..." to update what will be committed)
(use "git checkout -- <file>..." to discard changes in working directory)

modified:   1
no changes added to commit (use "git add" and/or "git commit -a")
ARGL… well, paste it in again…
git add 1
git commit -m "hack"
[master aba911a] hack
 1 file changed, 1 insertion(+), 1 deletion(-)
Finally I managed to commit my file. Now, let’s push it back.
2.2.3 Push it back
git push
warning: push.default is unset; its implicit value is changing in
Git 2.0 from 'matching' to 'simple'. To squelch this message
and maintain the current behavior after the default changes, use:

  git config --global push.default matching

To squelch this message and adopt the new behavior now, use:

  git config --global push.default simple

See 'git help config' and search for 'push.default' for further information.
(the 'simple' mode was introduced in Git 1.7.11. Use the similar mode
'current' instead of 'simple' if you sometimes use older versions of Git)

Counting objects: 5, done.
(1/3)
Writing objects:  66% (2/3)
Writing objects: 100% (3/3)
Writing objects: 100% (3/3), 222 bytes, done.
Total 3 (delta 0), reused 0 (delta 0)
To /tmp/gitflow/orig
master
HA! It’s in.
2.2.4 Overview
In short the required commands look like this:
- git clone orig mine
- cd mine; (hack)
- git config user.name "contributor"
- git config user.email "con@tribut.or"
- git add 1
- git commit -m "hack"
- (request permission to push)
- git push

compare Subversion:
Now let’s see what that initial setup with setting a non-master branch was about…
2.3 With testing
2.3.1 Test something
I want to test a change and ensure, that it works with a fresh clone. So I just clone my local repo and commit there.
cd ..
git clone mine test
cd test
# setup the user locally again. Normally you do not need that again, since you’d use --global.
git config user.email "contributor"
git config user.name "con@tribut.or"
# hack and commit
echo test > 1
git add 1
echo # cosmetic
git commit -m "change to test" >/dev/null
# (run the tests)
2.3.2 Push it back
git push
warning: push.default is unset; its implicit value is changing in
Git 2.0 from 'matching' to 'simple'. To squelch this message
and maintain the current behavior after the default changes, use:

  git config --global push.default matching

To squelch this message and adopt the new behavior now, use:

  git config --global push.default simple

See 'git help config' and search for 'push.default' for further information.
(the 'simple' mode was introduced in Git 1.7.11. Use the similar mode
'current' instead of 'simple' if you sometimes use older versions of Git)

Counting objects: 5, done.
(1/3)
Writing objects:  66% (2/3)
Writing objects: 100% (3/3)
Writing objects: 100% (3/3), 234 bytes, done.
Total 3 (delta 0), reused 0 (delta 0)
remote: error: refusing to update checked out branch: refs/heads/master
remote: error: By default, updating the current branch in a non-bare repository
remote: error: is denied, because it will make the index and work tree inconsistent
remote: error: with what you pushed, and will require 'git reset --hard' to match
remote: error: the work tree to HEAD.
remote: error:
remote: error: You can set 'receive.denyCurrentBranch' configuration variable to
remote: error: 'ignore' or 'warn' in the remote repository to allow pushing into
remote: error: its current branch; however, this is not recommended unless you
remote: error: arranged to update its work tree to match what you pushed in some
remote: error: other way.
remote: error:
remote: error: To squelch this message and still keep the default behaviour, set
remote: error: 'receive.denyCurrentBranch' configuration variable to 'refuse'.
To /tmp/gitflow/mine
master (branch is currently checked out)
error: failed to push some refs to '/tmp/gitflow/mine'
Uh… what? If I were a real first time user, at this point I would just send a patch…
The simple local test clone does not work: You actually have to also checkout a different branch if you want to be able to push back (needless duplication of information - and effort). And it actually breaks this simple workflow.
(experienced git users will now tell me that you should always checkout a work branch. But that would mean that I would have to add the additional branching step to the simplest case without testing repo, too, raising the bar for contribution even higher)
git checkout -b testing master
git push ../mine testing
Switched to a new branch 'testing'
Counting objects: 5, done.
(1/3)
Writing objects: 66% (2/3) Writing objects: 100% (3/3) Writing objects: 100% (3/3), 234 bytes, done. : Total 3 (delta 0), reused 0 (delta 0) : To ../mine : testing
Since I only pushed to mine, I now have to go there, merge and push.
cd ../mine
git merge testing
git push
Updating aba911a..820dea8
Fast-forward
 1 | 2 +-
 1 file changed, 1 insertion(+), 1 deletion(-)
warning: push.default is unset; its implicit value is changing in
Git 2.0 from 'matching' to 'simple'. To squelch this message
and maintain the current behavior after the default changes, use:

  git config --global push.default matching

To squelch this message and adopt the new behavior now, use:

  git config --global push.default simple

See 'git help config' and search for 'push.default' for further information.
(the 'simple' mode was introduced in Git 1.7.11. Use the similar mode
'current' instead of 'simple' if you sometimes use older versions of Git)

Counting objects: 5, done.
(1/3)
Writing objects:  66% (2/3)
Writing objects: 100% (3/3)
Writing objects: 100% (3/3), 234 bytes, done.
Total 3 (delta 0), reused 0 (delta 0)
To /tmp/gitflow/orig
master
2.3.3 Overview
In short the required commands for testing look like this:
- git clone mine test
- cd test; (hack)
- git add 1
- git checkout -b testing master
- git commit -m "hack"
- git push ../mine testing
- cd ../mine
- git merge testing
- git push

Compare to Subversion
2.4 Wrapup
The git workflows broke at several places:
Simplest:
- Set the username (minor: it’s just pasting shell commands)
- Add every change (==staging. Minor: paste shell commands again - or use `commit -a`)
Testing clone (only additional breakages):
- Cannot push to the local clone (major: it spews about 20 lines of error messages which do not tell me how to actually get my changes into the local clone)
- Have to use a temporary branch in a local clone to be able to push back (annoyance: makes using clean local clones really annoying).
3Mercurial
Now let’s try the same
3.1 Setup the test
LC_ALL=C
LANG=C
PS1="$"
rm -rf /tmp/hgflow > /dev/null
mkdir -p /tmp/hgflow > /dev/null
cd /tmp/hgflow > /dev/null
# init the repo
hg init orig  > /dev/null
cd orig > /dev/null
echo 1 > 1 > /dev/null
# add a commit
hg add 1 > /dev/null
hg commit -u upstream -m 1 > /dev/null
cd .. >/dev/null
echo # purely cosmetic and implementation detail: this adds a new line to the output
ls
The most happy marriage I can imagine to myself would be the union
of a deaf man to a blind woman.
        -- Samuel Taylor Coleridge
arne@fluss ~/.emacs.d/private/journal $ arne@fluss ~/.emacs.d/private/journal $ $$$$$$$$$$$$
orig
hg --version
Mercurial Distributed SCM (version 2.5.2)
(see http://https://mercurial-scm.org for more information)

Copyright (C) 2005-2012 Olivia Mackall and others
This is free software; see the source for copying conditions. There is NO
warranty; not even for MERCHANTABILITY or FITNESS FOR A PARTICULAR PURPOSE.
3.2 Simplest case
3.2.1 Get the repo
hg clone orig mine
echo $ ls
ls
updating to branch default
1 files updated, 0 files merged, 0 files removed, 0 files unresolved
$ ls
mine  orig
3.2.2 Hack a bit
cd mine
echo 2 > 1
echo
# I disable the username to show the problem
hg --config ui.username= commit -m "hack"
$
$abort: no username supplied (see "hg help config")
ARGL, what??? Mind the update at the top of this article: This is fixed in Mercurial 3.0
Well, let’s do what it says (but only see the first 30 lines to avoid blowing up this example):
hg help config | head -n 30 | grep -B 3 -A 1 per-repository
These files do not exist by default and you will have to create the
    appropriate configuration files yourself: global configuration like the
USERPROFILE%\mercurial.ini" or
HOME/.hgrc" and local configuration is put into the per-repository
/.hg/hgrc" file.
Are you serious??? I have to actually read a guide just to commit my change??? As normal user this would tip my frustration with the tool over the edge and likely get me to just send a patch… Mind the update at the top of this article: This is fixed in Mercurial 3.0
But I am no normal user, since I want to write this guide. So I assume a really patient user, who does the following (after reading for 3 minutes):
echo '[ui]
username = "contributor"' >> .hg/hgrc
and tries again:
hg commit -m "hack"
Now it worked. But this is MAJOR BREAKAGE. Mind the update at the top of this article: This is fixed in Mercurial 3.0
3.2.3 Push it back
hg push
pushing to /tmp/hgflow/orig
searching for changes
adding changesets
adding manifests
adding file changes
added 1 changesets with 1 changes to 1 files
Done. This was easy, and I did not get yelled at (different from the experience with git :) ).
3.2.4 Overview
In short the required commands look like this:
- hg clone orig mine
- cd mine; (hack)
- hg help config ; (read) ; echo '[ui]
username = "contributor"' >> .hg/hgrc (are you serious?)
- hg commit -m "hack"
- (request permission to push)
- hg push

Compare to Subversion
and to git
3.3 With testing
3.3.1 Test something
cd ..
hg clone mine test
cd test
# setup the user locally again. Normally you do not need that again, since you’d use --global.
echo '[ui]
username = "contributor"' >> .hg/hgrc
# hack and commit
echo test > 1
echo # cosmetic
hg commit -m "change to test"
# (run the tests)
updating to branch default
1 files updated, 0 files merged, 0 files removed, 0 files unresolved
$$> $$$
3.3.2 Push it back
hg push
pushing to /tmp/hgflow/mine
searching for changes
adding changesets
adding manifests
adding file changes
added 1 changesets with 1 changes to 1 files
It’s in mine now, but I still need to push it from there.
cd ../mine
hg push
pushing to /tmp/hgflow/orig
searching for changes
adding changesets
adding manifests
adding file changes
added 1 changesets with 1 changes to 1 files
Done.
If I had worked on mine in the meantime, I would have to merge there, too - just as with git with the exception that I would not have to give a branch name. But since we’re in the simplest case, we don’t need to do that.
3.3.3 Overview
In short the required commands for testing look like this:
- hg clone mine test
- cd test; (hack)
- hg commit -m "hack"
- hg push ../mine
- cd ../mine
- hg push

Compare to Subversion
and to git
3.4 Wrapup
The Mercurial workflow broke only ONCE, but there it broke HARD: To commit you actually have to READ THE HELP PAGE on config to find out how to set your username.
So, to wrap it up: ARE YOU SERIOUS? Mind the update at the top of this article: This is fixed in Mercurial 3.0
That’s a really nice workflow, disturbed by a devastating user experience for just one of the commands.
This is a place where hg should learn from git: The initial setup must be possible from the commandline, without reading a help page and without changing to an editor and then back into the commandline.
4 Summary
- Git broke at several places, and in one place it broke hard: Pushing between local clones is a huge hassle, even though that should be a strong point of DVCSs.
- Mercurial broke only once, but there it broke hard: Setting the username actually requires reading help output and hand-editing a text file.
Also the workflows for a user who gets permission to push always required some additional steps compared to Subversion.
One of the additional steps cannot be avoided without losing offline-commits (which are a major strength of DVCS), because those make it necessary to split svn commit into commit and push: That separates storing changes from sharing them.
But git actually requires additional steps which are only necessary due to implementation details of its storage layer: Pushing to a repo with the same branch checked out is not allowed, so you have to create an additional branch in your local clone and merge it in the other repo, even if all your changes are siblings of the changes in the other repository, and it requires either a flag to every commit command or explicit adding of changes. That does not amount to the one unavoidable additional command, but actually further three commands, so the number of commands to get code, hack on it and share it increases from 5 to 9. And if you work in a team where people trust you to write good code, that does not actually reduce the required effort to share your changes.
On the other hand, both Mercurial and Git allow you to work offline, and you can do as many testing steps in between as you like, without needing to get the changes from the server every time (because you can simply clone a local repo for that).
4.1 Visually
4.1.1 Subversion
4.1.2 Mercurial
4.1.3 Git
| Anhang | Größe |
|---|---|
| dvcs-basic-svn.png | 2.53 KB |
| dvcs-basic-svn-testing.png | 2.68 KB |
| dvcs-basic-hg.png | 2.72 KB |
| dvcs-basic-hg-testing.png | 3.08 KB |
| dvcs-basic-git.png | 2.89 KB |
| dvcs-basic-git-testing.png | 3.95 KB |
| 2013-04-17-Mi-basic-usecase-dvcs.org | 13.02 KB |
| 2013-04-17-Mi-basic-usecase-dvcs.pdf | 274.67 KB |
Creating nice logs with revsets in Mercurial
In the mercurial list Stanimir Stamenkov asked how to get rid of intermediate merges in the log to simplify reading the history (and to not care about missing some of the details).
Update: Since Mercurial 2.4 you can simply use
hg log -Gr "branchpoint()"
I did some tests for that and I think the nicest representation I found is this:
hg log -Gr "(all() - merge()) or head()"
This article shows examples for this. To find more revset options, run hg help revsets.
The result
It showed that in the end the revisions converged again - and it shows the actual states of the development.
$ hg log -Gr "(all() - merge()) or head()"
@    Änderung:        7:52fe4a8ec3cc
|\   Marke:           tip
| |  Vorgänger:       6:7d3026216270
| |  Vorgänger:       5:848c390645ac
| |  Nutzer:          Arne Babenhauserheide <bab@draketo.de>
| |  Datum:           Tue Aug 14 15:09:54 2012 +0200
| |  Zusammenfassung: merge
| |
| \
| |\
| | o  Änderung:        3:55ba56aa8299
| | |  Vorgänger:       0:385d95ab1fea
| | |  Nutzer:          Arne Babenhauserheide <bab@draketo.de>
| | |  Datum:           Tue Aug 14 15:09:40 2012 +0200
| | |  Zusammenfassung: 4
| | |
| o |  Änderung:        2:b500d0a90d40
| |/   Vorgänger:       0:385d95ab1fea
| |    Nutzer:          Arne Babenhauserheide <bab@draketo.de>
| |    Datum:           Tue Aug 14 15:09:39 2012 +0200
| |    Zusammenfassung: 3
| |
o |  Änderung:        1:8cc66166edc9
|/   Nutzer:          Arne Babenhauserheide <bab@draketo.de>
|    Datum:           Tue Aug 14 15:09:38 2012 +0200
|    Zusammenfassung: 2
|
o  Änderung:        0:385d95ab1fea
   Nutzer:          Arne Babenhauserheide <bab@draketo.de>
   Datum:           Tue Aug 14 15:09:38 2012 +0200
   Zusammenfassung: 1
Even shorter, but not quite correct
The shortest representation is without the heads, though. It does not represent the current state of development if the last commit was a merge or if some branches were not merged. Otherwise it is equivalent.
$ hg log -Gr "(all() - merge())"
o  Änderung:        3:55ba56aa8299
|  Vorgänger:       0:385d95ab1fea
|  Nutzer:          Arne Babenhauserheide <bab@draketo.de>
|  Datum:           Tue Aug 14 15:09:40 2012 +0200
|  Zusammenfassung: 4
|
| o  Änderung:        2:b500d0a90d40
|/   Vorgänger:       0:385d95ab1fea
|    Nutzer:          Arne Babenhauserheide <bab@draketo.de>
|    Datum:           Tue Aug 14 15:09:39 2012 +0200
|    Zusammenfassung: 3
|
| o  Änderung:        1:8cc66166edc9
|/   Nutzer:          Arne Babenhauserheide <bab@draketo.de>
|    Datum:           Tue Aug 14 15:09:38 2012 +0200
|    Zusammenfassung: 2
|
o  Änderung:        0:385d95ab1fea
   Nutzer:          Arne Babenhauserheide <bab@draketo.de>
   Datum:           Tue Aug 14 15:09:38 2012 +0200
   Zusammenfassung: 1
The basic log For reference
The vanilla-log looks like this:
$ hg log -G
@    Änderung:        7:52fe4a8ec3cc
|\   Marke:           tip
| |  Vorgänger:       6:7d3026216270
| |  Vorgänger:       5:848c390645ac
| |  Nutzer:          Arne Babenhauserheide <bab@draketo.de>
| |  Datum:           Tue Aug 14 15:09:54 2012 +0200
| |  Zusammenfassung: merge
| |
| o    Änderung:        6:7d3026216270
| |\   Vorgänger:       2:b500d0a90d40
| | |  Vorgänger:       4:8dbc55213c9f
| | |  Nutzer:          Arne Babenhauserheide <bab@draketo.de>
| | |  Datum:           Tue Aug 14 15:09:45 2012 +0200
| | |  Zusammenfassung: merged 4
| | |
o | |  Änderung:        5:848c390645ac
|\| |  Vorgänger:       3:55ba56aa8299
| | |  Vorgänger:       2:b500d0a90d40
| | |  Nutzer:          Arne Babenhauserheide <bab@draketo.de>
| | |  Datum:           Tue Aug 14 15:09:43 2012 +0200
| | |  Zusammenfassung: merged 2
| | |
+---o  Änderung:        4:8dbc55213c9f
| | |  Vorgänger:       3:55ba56aa8299
| | |  Vorgänger:       1:8cc66166edc9
| | |  Nutzer:          Arne Babenhauserheide <bab@draketo.de>
| | |  Datum:           Tue Aug 14 15:09:41 2012 +0200
| | |  Zusammenfassung: merged 1
| | |
o | |  Änderung:        3:55ba56aa8299
| | |  Vorgänger:       0:385d95ab1fea
| | |  Nutzer:          Arne Babenhauserheide <bab@draketo.de>
| | |  Datum:           Tue Aug 14 15:09:40 2012 +0200
| | |  Zusammenfassung: 4
| | |
| o |  Änderung:        2:b500d0a90d40
|/ /   Vorgänger:       0:385d95ab1fea
| |    Nutzer:          Arne Babenhauserheide <bab@draketo.de>
| |    Datum:           Tue Aug 14 15:09:39 2012 +0200
| |    Zusammenfassung: 3
| |
| o  Änderung:        1:8cc66166edc9
|/   Nutzer:          Arne Babenhauserheide <bab@draketo.de>
|    Datum:           Tue Aug 14 15:09:38 2012 +0200
|    Zusammenfassung: 2
|
o  Änderung:        0:385d95ab1fea
   Nutzer:          Arne Babenhauserheide <bab@draketo.de>
   Datum:           Tue Aug 14 15:09:38 2012 +0200
   Zusammenfassung: 1
Creating the test repo
To create the test repo, I just used a few short loops in the shell:
hg init test ; cd test
for i in 1 2 3 4; do echo $i > $i ; hg ci -Am "$i"; hg up -r -$i; done
for i in 1 2 3 4; do echo $i > $i ; hg ci -Am "$i"; hg up -r -$i; hg merge $i ; hg ci -m "merged $i"; done
for i in $(hg heads --template "{node} ") ; do hg merge $i ; hg ci -m "merge"; done
Better representations?
Do you have better representations for viewing convoluted history?
PS: Yes, you can rewrite history, but that’s a really bad idea if you have many people who closely interact and publish early and often.
Factual Errors in “Git vs Mercurial: Why Git?” -- and corrections shown by example
Update 2016: Instead of fixing the article, the Atlassian web workers removed the comments which point out the misinformation in the article. *sigh*
Summary:
In the Atlassian Blog, a Git proponent spread blatant misinformation which the Atlassian folks are leaving uncommented even though the falseness has been shown by multiple people and even in examples in the article itself.
The claims and corrections:
- Claim: Git never loses unreferenced data. Mercurial needs special handling to retrieve unreferenced data. Reality: Due to automatic garbage collection, history editing in git unpredictably loses unreferenced history while Mercurial stores permanent backups which can be retrieved with core commands.
- Claim: Only git branches are namespaced. Reality: Mercurial bookmarks are namespaced with
bookmark@path, when there could be confusion. This is equivalent to git’s use ofpath/branch, but only used where it is needed, while git forces the user to always make that distinction. - Claim: Only git can provide a staging area. Reality: Activating mercurial queues (
mq) and the record extension provides a staging area like the git index — for those who want it. - Claim: Git is more powerful. Reality: Both have the same raw power (as proven by transparent access with Mercurial to Git repos via hg-git), but
- its “cuddly command line” gives Mercurial an efficiency during actual usage which most people do not find in Git.
2 years ago, Atlassian developer Charles O’Farrell published the article Git vs. Mercurial: Why Git? in which he claimed to show "the winning side of Git”. This article was part of the Dev Tools series at Atlassian and written as a reply to the article Why Mercurial?. It was spiced with so much misinformation about Mercurial (statements which were factually wrong) that the comments exploded right away. But the article was never corrected. Just now I was referred to the text again, and I decided to do what I should have done 2 years ago: Write an answer which debunks the myths.
“I also think that git isn’t the most beginner-friendly program. That’s why I’m only using its elementary features” — “I hear that from many git-users …” — part of the discussion which got me to write this article
Table of Contents
Safer history and rewriting history with Git
Charles starts off by contradicting himself: He claims that git is safer, because it “actually never lets you change anything” - and goes on to explain, that all unreferenced data can be garbage collected after 30 days. Since nowadays the git garbage collector runs automatically, all unreferenced changes are lost after approximately 30 days.
This obviously means that git does allow you to change something. That this change only becomes irreversible after 30 days is an implementation detail which you have to keep in mind if you want to be safe.1
He then goes on to say how this allows for easy history rewriting with the interactive rebase and correctly includes, that the histedit extension of Mercurial allows you to do the same. (He also mentions the Mercurial Queues Extension (mq), just to admit that it is not the equivalent of git rebase -i but instead provides a staging area for future commits).
Then he starts the FUD2: Since histedit stores its backup in an external file, he asks rhetorically what new commands he would have to learn to restore it.
Dear reader, what new command might be required to pull data out of a backup? Something like git ref? Something like git reflog to find it and then something else?
Turns out, this is as easy and consistent as most things in Mercurial: Backup bundles can be treated just like repositories: To restore the changes, simply use
hg pull backup.bundle
So, all FUD removed, his take on safer history and rewriting history is reduced to “in hg it’s different, and potentially confusing features are shipped as extensions. Recovering changes from backups is consistent with your day-to-day usage of hg”.
(note that the flexibility of hg also enables the creation of extensions like mutable hg which avoids all the potential race conditions with git rebase - even for code you share between repositories (which is a total no-go in git), with a safety net which warns you if you try to change published history; thanks to the core feature phases)
Branching
On branching Charles goes deep into misinformation: He wrote his article in the year 2012, when Mercurial had already provided named branches as well as anonymous branching for 6 years, and one year after bookmarks became a core feature in hg 1.8, and he kept talking about how Mercurial advised to keep one clone per branch by referencing to a blog post which incorrectly assumed that the hg developers were using that workflow (obviously he did not bother to check that claim). Also he went on clamoring, that bookmarks initially could not be pushed between repositories, and how they were added “due to popular demand”. The reality is, that at some point a developer simply said “I’ll write that”. And within a few months, he implemented the equivalent of git branches. Before that, no hg developer saw enough need for them to excert that effort and today most still simply use named branches.
But obviously Charles could not imagine named branches to work, so he kept talking about how bookmarks do not have namespaces while git branches have them, and that this would create confusion. He showed the following example for git and Mercurial (shortened here):
* 9e4b1b8 (origin/master, origin/test) Remove unused variable
| * 565ad9c (HEAD, master) Added Hello example
|/
* 46f0ac9 Initial commit
and
o  changeset:   2:67deb4acba33
|  bookmark:    master@default
|  summary:     Third commit
|
| @  changeset:   1:2d479c025719
|/   bookmark:    master
|    summary:     Second commit
|
o  changeset:   0:e0e024ff06ad
   summary:     First commit
Then he asked: “would the real master branch please stand up?”
Let’s try to answer that:
Git: there is a commit marked as (origin/master, origin/test), and one marked as (HEAD, master). If you know that origin is the canonical remote repository in git, then you can guess, that the names prefixed with origin/ come from the remote repository.
Mercurial: There is a commit with the bookmark master@default and one with the bookmark master. When you know that default is the canonical remote repository in Mercurial, then you can guess, that the bookmark postfixed with @default comes from the remote repository.
But Charles concludes his example with the sentence: “Because there is no notion of namespaces, we have no way of knowing which bookmarks are local and which ones are remote, and depending on what we call them, we might start running into conflicts.”
And this is not only FUD, it is factually wrong and disproven in his own example. After this, I cannot understand how anyone could take his text seriously.
But he goes on.
Staging
His final misinformation is about the git index - a staging area for uncommitted changes. He correctly identifies the index as “one of the things that people either love or hate about Git”. As Mercurial cares a lot about giving newcomers a safe environment to work in, it ships this controversial feature as extension and not as core command.
Charles now claims that the equivalent of the git index is the record extension - and then complains that it does not imitate the index exactly, because it does not give a staging area but rather allows committing partial changes. Instead of now turning towards the Mercurial Queues Extension which he mentioned earlier as staging area for commits, he asserts that record cannot provide the same feature as git.
Not very surprisingly, when you have an extension to provide partial commits (record) and one to provide a staging area (mq), if you want both, you simply activate both extensions. When you do that, Mercurial offers the qrecord command which stores partial changes in the current staging area.
Not mentioning this is simply a matter of not having done proper research for his article - and not updating the post means that he intentionally continues to spread misinformation.
Blame
The only thing he got right is that git blame is able to reconstruct copies of code from one file to another.
Mercurial provides this for renamed files, but not for directly copy-pasted lines. Analysis of the commits would naturally allow doing the same, and all the information for that is available, but this is not implemented yet. If people ask for it loud enough, it will only be a matter of time, though. As bookmarks showed, the Mercurial code base is clean enough that it suffices to have a single developer who steps up and creates an extension for this. If enough people use it, the extension can become a core feature later on.
Conclusion
“There is a reason why hg users tend to talk less about hg: There is no need to talk about it that much.” — Arne Babenhauserheide as answer to Why Mercurial?
Charles concludes with “Git means never having to say, you should have”, and “Mercurial feels like Git lite”. Since he obviously did not do his research on Mercurial while he took the time to acquire in-depth knowledge of git, it’s quite understandable that he thinks this. But it is no base for writing an article - especially not for Atlassian, the most prominent Mercurial hosting provider since their acquisition of Bitbucket, which grew big as pure Mercurial hoster and added git after being acquired by Atlassian.
He then manages to finish his article with one more unfounded smoke bomb: The repository format drives what is possible with our DVCS tools, now and in the future.
While this statement actually is true, in the context of git-vs-mercurial it is a horrible misfit: The hg-git extension shows since 2009, 3 years before Charles wrote his article, that it is possible to convert transparently from git to Mercurial and back. So the repository format of Mercurial has all capabilities of the repository format of git - and since git cannot natively store named branches, represent branches with multiple heads or push changes into a checked out branch, the capabilities of the repository format of Mercurial are actually a superset of the capabilities of the storage format of Git.
But what he also states is that “there are more important things than having a cuddly command line”. And this is the final misleading statement to debunk: While the command line does not determine what is theoretically possible with the tool, it does determine what regular users can do with it. The horrible command line of git likely contributes to the many git users who never use anything but commit -a, push and pull - and to the proliferation of git gurus whom the normal users call when git shot them into their foot again.
It’s sad when someone uses his writing skills to wrap FUD and misinformation into pretty packaging to get people to take his side. Even more sad is, that this often works for quite some time and that few people read the comments section.3
And now that I finished debunking the article, there is one final thing I want to share. It is a quote from the discussion which prompted me to write this piece:
<…> btw. I also think that git isn’t the most beginner-friendly program.
<…> That’s why I’m only using its elementary features
<ArneBab> I hear that from many git-users…
<…> oh, maybe I should have another look at hg after all
This is a translation of the real quote in German:
<…> ich finde btw auch dass git nicht gerade das anfängerfreundlichste programm ist
<…> darum nutze ich das auch nur recht rudimentär
<ArneBab> das höre ich von vielen git-Nutzern…
<…> oha. nagut, dann sollte ich mir hg vielleicht doch nochmal ansehen
Note: hg is short for Mercurial. It is how Mercurial is called on the command line.
Footnotes:
Garbage collection after 30 days means that you have to remember additional information while you work. And that is a problem: You waste resources which would be better spent on the code you write. A DVCS should be about having to remember less, because your DVCS keeps the state for you.
FUD means fear-uncertainty-doubt and is a pretty common technique used to discredit things when one has no real arguments: Instead of giving a clear argument which can be debunked, just make some vague hints that something might be wrong or that there might be some deficiency or danger. Most readers will never check this and so this establishes the notion that something IS wrong.
Lesson learned: If you take the time to debunk something in the comments, be sure to also write an article about it. Otherwise you might find the same misinformation still being spread 2 years later by the same people. When Atlassian bought Bitbucket, that essentially amounted to a hostile takeover of a Mercurial team by git-zealots. And they got away with this, because too few people called them up on it in public.
BitBucket got big on Mercurial — until they got bought by Atlassian
A comment on largefile support missing in BitBucket, despite being a much-requested feature since 2012.
Note that it’s not Atlassian which got big with Mercurial. It’s Bitbucket which got big with Mercurial, and it was later bought by Atlassian. Also Atlassian is still spreading lies about Mercurial in the Atlassian blog by hosting a guest entry by a git zealot which is filled with factual errors, some even disproven in the examples in the article. Despite being called out on that in public, they did not even see the need to add a note to that guest entry about misunderstanding by the author.
I asked their marketing team personally several times to correct this. I know they read it, because people I used to collaborate with work at the BitBucket Mercurial support.
Dear BitBucket, this is where you could be: Virtuos Games uses BitTorrentSync with Mercurial for game development using decentralized large asset storage.
I guess they show that there is room for a Mercurial hosting company. Maybe it will be kiln.
I‘m sorry for the great Mercurial developers working at Atlassian to improve Mercurial support. I know you’re doing great work and I hope you will prove me wrong on this. But from the outside it seems like you’re being used to hide hostility by the parent company against the core part of their own product. “…we decided to collaborate with GitHub on building a standard for large file support” — seriously? There is already a standard for large file support which has been part of Mercurial core since 2011, and works almost seamlessly. It just needs support from BitBucket to be easier for BitBucket users.
This crazyness is a new spin on never trust a company: never ever trust a zealot with a tool which helps “the other side”: They are prone to even put zeal over business. For everyone at BitBucket: If this isn’t a wakeup call, I don’t know what is.
And if you like Git and are happy for a competitor to get weakened: To you really want your tool to win by spreading intentional misinformation? Wouldn’t you feel more at ease seeing your tool win by merit of better technology, not by buying companies which support other tools and then starving them down and forcing them to badmouth their own technology?
git vs. hg - offensive
In many discussions on DVCS over the years I have been fair, friendly and technical while receiving vitriol and misinformation and FUD. This strip visualizes the impression which stuck to my mind when speaking with casual git-users.
Update: I found a very calm discussion at a place where I did not expect it: reddit. I’m sorry to you, guys. Thank you for proving that a constructive discussion is possible from both sides! I hope that you are not among the ones offended by this strip.
To Hg-users: There are git users who really understand what they are doing and who stick to arguments and friendly competition. This comic arose from the many frustrating experiences with the many other git users. Please don’t let this strip trick you into going down to non-constructive arguments. Let’s stay friendly. I already feel slightly bad about this short move into competition-like visualization for a topic where I much prefer friendly, constructive discussions. But it sucks to see contributors stumble over git, so I think it was time for this.
»I also think that git isn’t the most beginner-friendly program. That’s why I’m using only its elementary features«
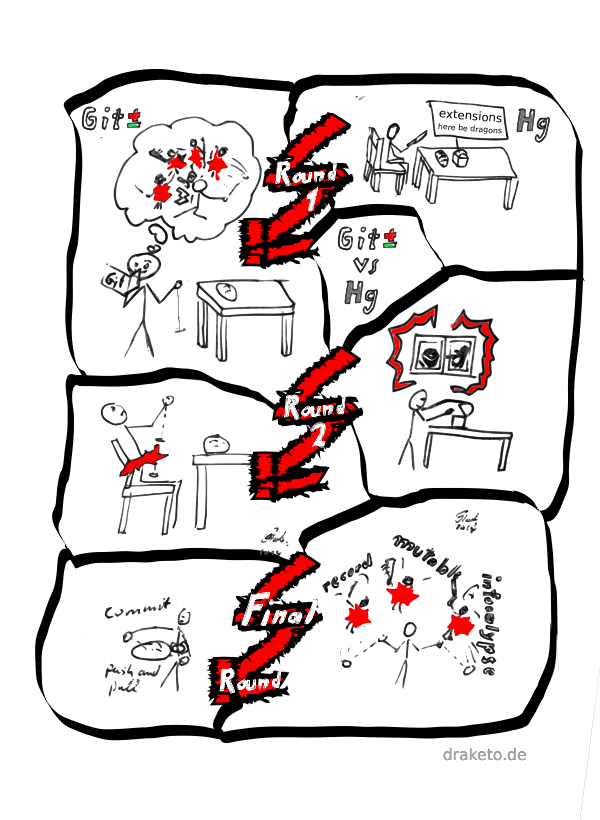
To put the strip in words, let’s complete the quote:
»I also think that git isn’t the most beginner-friendly program.
That’s why I’m using only its elementary features«
<ArneBab> I hear that from many git-users…
»oh, maybe I should have another look at hg after all«
Why this?
Because there are far too many Git-Users who only dare using the most basic commands which makes git at best useless and at worst harmful.
This is not the fault of the users. It is the fault of the tool.
This strip is horrible!
If you are offended by this strip: You knew the title when you came here, right?
And if you are offended enough, that you want to make your own strip and set things right, go grab the source-file, fire up krita and go for it! This strip is free.1
Commentary
If you feel that this strip fits Mercurial and Git perfectly, keep in mind, that this is only one aspect of the situation, and that using Git is still much better than being forced to use centralized or proprietary version tracking (and people who survive the initial phase mostly unscarred can actually do the same with Git as they could with Mercurial).
And Mercurial also has its share of problems - even horrible ones (update 2014: These were fixed in version 3.0) - but compared to Git it is a wonder of usability.
And in case this strip does not apply to your usage of Git: there are far too many people whose experience it fits - and this should not be the case for the most widespread system for accessing the code of free software projects.
(and should this strip be completely unintelligible to you: curse a world in which the concept of monofilament whips isn’t mainstream ☺ — let’s get more people to play Shadowrun)
The way forward
So if you are one of the people, who mostly use commit, pull and push, and turn to a Git-Guru when things break, then you might want to kiss the Git-Guru goodbye and give Mercurial a try.
By the way: the extensions named in the Final Round are record, mutable and infocalypse: Select the changes to commit on a hunk-by-hunk base, change history with automatic conflict resolution (even for rebase) and collaborate anonymously over Freenet.
And if you are one of the Git Gurus who claim that squashing attacking Ninjas is only possible with Git, have a look what a Firefox-contributor and former long-term Git-User and a Facebook infrastructure developer have to say about this.
-
All the graphics in this strip are available under free licenses: creative-commons attribution or GPLv3 or later — you decide which of those you use. If it is cc attribution, call me Arne Babenhauserheide and link to this article. You’ll find all the sources as well as some preliminary works and SVGs in git-vs-hg-offensive.tar_.gz or git-vs-hg-offensive.zip (whichever you prefer)


| Anhang | Größe |
|---|---|
| git-vs-hg-offensive-purevector-retouch2.png | 184.31 KB |
| git-vs-hg-offensive.tar_.gz | 22.59 MB |
| git-vs-hg-offensive.zip | 22.62 MB |
| git-vs-hg-offensive.png | 185.98 KB |
| git-vs-hg-offensive-purevector-retouch2.kra | 377.58 KB |
| git-vs-hg-offensive-thumb.jpg | 11.3 KB |
| git-vs-hg-offensive-thumb-240x240.jpg | 11.78 KB |
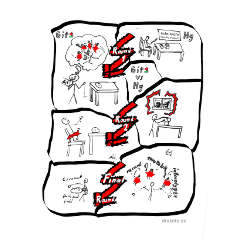
Gentoo live ebuild for Mercurial
We (nelchael and me) just finished a live ebuild for Mercurial which allows to conveniently track the main (mpm) repo of Mercurial in Gentoo.
To use the ebuild, just add
=dev-util/mercurial-9999 **
to your package.keywords and emerge mercurial (again).
It took us a while since we had to revise the Mercurial eclass to always build Mercurial live packages from their Mercurial repository and nelchael took the chance to completely overhaul the eclass.
If you're interested in the details, please have a look at the ebuild and the eclass as well as the tracking bug.
To use the eclass in an ebuild, just add inherit mercurial at the beginning of the ebuild and set EHG_REPO_URI to the correct repository URI. If you need to share a single repository between several ebuilds, set EHG_PROJECT to the project name in all of them.
Have fun with Mercurial!
Learning Mercurial in Workflows
The official workflow guide for Mercurial, mirrored from mercurial-scm.org/guide. License: GPLv2 or later.
It delves into nonlinear history and merging right from the beginning and uses only features you get without activating extensions. Due to this it offers efficient and safe workflows without danger of losing already committed work.
With Mercurial you can use a multitude of different workflows. This page shows some of them, including their use cases. It is intended to make it easy for beginners of version tracking to get going instantly and learn completely incrementally. It doesn't explain the concepts used, because there are already many other great resources doing that, for example the wiki and the hgbook.
If you want a more exhaustive tutorial with the basics, please have a look at the Tutorial in the Mercurial Wiki. For a really detailed and very nice to read description of Mercurial, please have a look at Mercurial: The Definitive Guide.
Note:
This guide doesn't require any prior knowledge of version control systems (though subversion users will likely feel at home quite quickly). Basic command line abilities are helpful, because we'll use the command line client.
Basic workflows
We go from simple to more complex workflows. Those further down build on previous workflows.
Log keeping
Use Case
The first workflow is also the easiest one: You want to use Mercurial to be able to look back when you did which changes.
This workflow only requires an installed Mercurial and write access to some file storage (you almost definitely have that :) ). It shows the basic techniques for more complex workflows.
Workflow
Prepare Mercurial
As first step, you should teach Mercurial your name. For that you open the file ~/.hgrc (or mercurial.ini in your home directory for Windows) with a text-editor and add the ui section (user interaction) with your username:
[ui]
username = Mr. Johnson <johnson@smith.com>
Initialize the project
Now you add a new folder in which you want to work:
$ hg init project
Add files and track them
$ cd project
$ (add files)
$ hg add
$ hg commit
(enter the commit message)
Note:
You can also go into an existing directory with files and init the repository there.
$ cd project
$ hg init
Alternatively you can add only specific files instead of all files in the directory. Mercurial will then track only these files and won't know about the others. The following tells mercurial to track all files whose names begin with "file0" as well as file10, file11 and file12.
$ hg add file0* file10 file11 file12
Save changes
$ (do some changes)
see which files changed, which have been added or removed, and which aren't tracked yet
$ hg status
see the exact changes
$ hg diff
commit the changes.
$ hg commit
now an editor pops up and asks you for a commit message. Upon saving and closing the editor, your changes have been stored by Mercurial.
Note:
You can also supply the commit message directly via hg commit -m 'MESSAGE'.
Move and copy files
When you copy or move files, you should tell Mercurial to do the copy or move for you, so it can track the relationship between the files.
Remember to commit after moving or copying. From the basic commands only commit creates a new revision
$ hg cp original copy
$ hg commit
(enter the commit message)
$ hg mv original target
$ hg commit
(enter the commit message)
Now you have two files, "copy" and "target", and Mercurial knows how they are related.
Note:
Should you forget to do the explicit copy or move, you can still tell Mercurial to detect the changes via hg addremove --similarity 100. Just use hg help addremove for details.
Check your history
$ hg log
This prints a list of changesets along with their date, the user who committed them (you) and their commit message.
To see a certain revision, you can use the -r switch (--revision). To also see the diff of the displayed revisions, there's the -p switch (--patch)
$ hg log -p -r 3
Lone developer with nonlinear history
Use case
The second workflow is still very easy: You're a lone developer and you want to use Mercurial to keep track of your own changes.
It works just like the log keeping workflow, with the difference that you go back to earlier changes at times.
To start a new project, you initialize a repository, add your files and commit whenever you finished a part of your work.
Also you check your history from time to time, so see how you progressed.
Workflow
Basics from log keeping
Init your project, add files, see changes and commit them.
$ hg init project
$ cd project
$ (add files)
$ hg add # tell Mercurial to track all files
$ (do some changes)
$ hg diff # see changes
$ hg commit # save changes
$ hg cp # copy files or folders
$ hg mv # move files or folders
$ hg log # see history
Seeing an earlier revision
Different from the log keeping workflow, you'll want to go back in history at times and do some changes directly there, for example because an earlier change introduced a bug and you want to fix it where it occurred.
To look at a previous version of your code, you can use update. Let's assume that you want to see revision 3.
$ hg update 3
Now your code is back at revision 3, the fourth commit (Mercurial starts counting at 0).
To check if you're really at that revision, you can use identify -n.
$ hg identify -n
Note:
identify without options gives you the short form of a unique revision ID. That ID is what Mercurial uses internally. If you tell someone about the version you updated to, you should use that ID, since the numbers can be different for other people. If you want to know the reasons behind that, please read up Mercurials [basic concepts]. When you're at the most recent revision, hg identify -n will return "-1".
To update to the most recent revision, you can use "tip" as revision name.
$ hg update tip
Note:
If at any place any command complains, your best bet is to read what it tells you and follow that advice.
Note:
Instead of hg update you can also use the shorthand hg up. Similarly you can abbreviate hg commit to hg ci.
Note:
To get a revision devoid of files, just update to "null" via hg update null. That's the revision before any files were added.
Fixing errors in earlier revisions
When you find a bug in some earlier revision you have two options: either you can fix it in the current code, or you can go back in history and fix the code exactly where you did it, which creates a cleaner history.
To do it the cleaner way, you first update to the old revision, fix the bug and commit it. Afterwards you merge this revision and commit the merge. Don't worry, though: Merging in mercurial is fast and painless, as you'll see in an instant.
Let's assume the bug was introduced in revision 3.
$ hg update 3
$ (fix the bug)
$ hg commit
Now the fix is already stored in history. We just need to merge it with the current version of your code.
$ hg merge
If there are conflicts use hg resolve - that's also what merge tells you to do in case of conflicts.
First list the files with conflicts
$ hg resolve --list
Then resolve them one by one. resolve attempts the merge again
$ hg resolve conflicting_file
(fix it by hand, if necessary)
Mark the fixed file as resolved
$ hg resolve --mark conflicting_file
Commit the merge, as soon as you resolved all conflicts. This step is also necessary when there were no conflicts!
$ hg commit
At this point, your fix is merged with all your other work, and you can just go on coding. Additionally the history shows clearly where you fixed the bug, so you'll always be able to check where the bug was.
Note:
Most merges will just work. You only need resolve, when merge complains.
So now you can initialize repositories, save changes, update to previous changes and develop in a nonlinear history by committing in earlier changesets and merging the changes into the current code.
Note:
If you fix a bug in an earlier revision, and some later revision copied or moved that file, the fix will be propagated to the target file(s) when you merge. This is the main reason why you should always use hg cp and hg mv.
Separate features
Use Case
At times you'll be working on several features in parallel. If you want to avoid mixing incomplete code versions, you can create clones of your local repository and work on each feature in its own code directory.
After finishing your feature you then pull it back into your main directory and merge the changes.
Workflow
Work in different clones
First create the feature clone and do some changes
$ hg clone project feature1
$ cd feature1
$ (do some changes and commits)
Now check what will come in when you pull from feature1, just like you can use diff before committing. The respective command for pulling is incoming
$ cd ../project
$ hg incoming ../feature1
Note:
If you want to see the diffs, you can use hg incoming --patch just as you can do with hg log --patch for the changes in the repository.
If you like the changes, you pull them into the project
$ hg pull ../feature1
Now you have the history of feature1 inside your project, but the changes aren't yet visible. Instead they are only stored inside a ".hg" directory of the project (more information on the store).
Note:
From now on we'll use the name "repository" for a directory which has a .hg directory with Mercurial history.
If you didn't do any changes in the project, while you were working on feature1, you can just update to tip (hg update tip), but it is more likely that you'll have done some other changes in between changes. In that case, it's time for merging.
Merge feature1 into the project code
$ hg merge
If there are conflicts use hg resolve - that's also what merge tells you to do in case of conflicts. After you merge, you have to commit explicitly to make your merge final
$ hg commit
(enter commit message, for example "merged feature1")
You can create an arbitrary number of clones and also carry them around on USB sticks. Also you can use them to synchronize your files at home and at work, or between your desktop and your laptop.
Note:
You also have to commit after a merge when there are no conflicts, because merging creates new history and you might want to attach a specific message to the merge (like "merge feature1").
Rollback mistakes
Now you can work on different features in parallel, but from time to time a bad commit might sneak in. Naturally you could then just go back one revision and merge the stray error, keeping all mistakes out of the merged revision. However, there's an easier way, if you realize your error before you do another commit or pull: rollback.
Rolling back means undoing the last operation which added something to your history.
Imagine you just realized that you did a bad commit - for example you didn't see a spelling error in a label. To fix it you would use
hg rollback
And then redo the commit
hg commit -m "message"
If you can use the command history of your shell and you added the previous message via commit -m "message", that following commit just means two clicks on the arrow-key "up" and one click on "enter".
Though it changes your history, rolling back doesn't change your files. It only undoes the last addition to your history.
But beware, that a rollback itself can't be undone. If you rollback and then forget to commit, you can't just say "give me my old commit back". You have to create a new commit.
Note:
Rollback is possible, because Mercurial uses transactions when recording changes, and you can use the transaction record to undo the last transaction. This means that you can also use rollback to undo your last pull, if you didn't yet commit anything new.
Sharing changes
Use Case
Now we go one step further: You are no longer alone, and you want to share your changes with others and include their changes.
The basic requirement for that is that you have to be able to see the changes of others.
Mercurial allows you to do that very easily by including a simple webserver from which you can pull changes just as you can pull changes from local clones.
Note:
There are a few other ways to share changes, though. Instead of using the builtin webserver, you can also send the changes by email or setup a shared repository, to where you push changes instead of pulling them. We'll cover one of those later.
Workflow
Using the builtin webserver
This is the easiest way to quickly share changes.
First the one who wants to share his changes creates the webserver
$ hg serve
Now all others can point their browsers to his IP address (for example 192.168.178.100) at port 8000. They will then see all his history there and can decide if they want to pull his changes.
$ firefox http://192.168.178.100:8000
If they decide to include the changes, they just pull from the same URL
$ hg pull http://192.168.178.100:8000
At this point you all can work as if you had pulled from a local repository. All the data is now in your individual repositories and you can merge the changes and work with them without needing any connection to the served repository.
Sending changes by email
Often you won't have direct access to the repository of someone else, be it because he's behind a restrictive firewall, or because you live in different timezones. You might also want to keep your changes confidential and prefer internal email (if you want additional protection, you can also encrypt the emails, for example with GnuPG).
In that case, you can easily export your changes as patches and send them by email.
Another reason to send them by email can be that your policy requires manual review of the changes when the other developers are used to reading diffs in emails. I'm sure you can think of more reasons.
Sending the changes via email is pretty straightforward with Mercurial. You just export your changes and attach (or copy paste) it in your email. Your colleagues can then just import them.
First check which changes you want to export
$ cd project
$ hg log
We assume that you want to export changeset 3 and 4
$ hg export 3 > change3.diff
$ hg export 4 > change4.diff
Now attach them to an email and your colleagues can just run import on both diffs to get your full changes, including your user information.
To be careful, they first clone their repository to have an integration directory as sandbox
$ hg clone project integration
$ cd integration
$ hg import change3.diff
$ hg import change4.diff
That's it. They can now test your changes in feature clones. If they accept them, they pull the changes into the main repository
$ cd ../project
$ hg pull ../integration
Note:
The patchbomb extension automates the email-sending, but you don't need it for this workflow.
Note:
You can also send around bundles, which are snippets of your actual history. Just create them via
$ hg bundle --base FIRST_REVISION_TO_BUNDLE changes.bundle
Others can then get your changes by simply pulling them, as if your bundle were an actual repository
$ hg pull path/to/changes.bundle
Using a shared repository
Sending changes by email might be the easiest way to reach people when you aren't yet part of the regular development team, but it creates additional workload: You have to bundle the changes, send mails and then import the bundles manually. Luckily there's an easier way which works quite well: The shared push repository.
Till now we transferred all changes either via email or via pull. Now we use another option: pushing. As the name suggests it's just the opposite of pulling: You push your changes into another repository.
But to make use of it, we first need something we can push to.
By default hg serve doesn't allow pushing, since that would be a major security hole. You can allow pushing in the server, but that's no solution when you live in different timezones, so we'll go with another approach here: Using a shared repository, either on an existing shared server or on a service like BitBucket. Doing so has a bit higher starting cost and takes a bit longer to explain, but it's well worth the effort spent.
If you want to use an existing shared server, you can use serve there and allow pushing. Also there are some other nice ways to allow pushing to a Mercurial repository, including simple access via SSH.
Otherwise you first need to setup a BitBucket Account. Just signup at BitBucket. After signing up (and login) hover your mouse over "Repositories". There click the item at the bottom of the opening dialog which say "Create new".
Give it a name and a description. If you want to keep it hidden from the public, select "private"
$ firefox http://bitbucket.org
Now your repository is created and you see instructions for pushing to it. For that you'll use a command similar to the following (just with a different URL)
$ hg push https://bitbucket.org/ArneBab/hello/
(Replace the URL with the URL of your created repository. If your username is "Foo" and your repository is named "bar", the URL will be https://bitbucket.org/Foo/bar/)
Mercurial will ask for your BitBucket name and password, then push your code.
Voilà, your code is online.
Note:
You can also use SSH for pushing to BitBucket.
Now it's time to tell all your colleagues to sign up at BitBucket, too.
After that you can click the "Admin" tab of your created repository and add the usernames of your colleagues on the right side under "Permission: Writers". Now they are allowed to push code to the repository.
(If you chose to make the repository private, you'll need to add them to "Permission: Readers", too)
If one of you now wants to publish changes, he'll simply push them to the repository, and all others get them by pulling.
Publish your changes
$ hg push https://bitbucket.org/ArneBab/hello/
Pull others changes into your local repository
$ hg pull https://bitbucket.org/ArneBab/hello/
People who join you in development can also just clone this repository, as if one of you were using hg serve
$ hg clone https://bitbucket.org/ArneBab/hello/ hello
That local repository will automatically be configured to pull/push from/to the online repository, so new contributors can just use hg push and hg pull without an URL.
Note:
To make this workflow more scalable, each one of you can have his own BitBucket repository and you can simply pull from the others repositories. That way you can easily establish workflows in which certain people act as integrators and finally push checked code to a shared pull repository from which all others pull.
Note:
You can also use this workflow with a shared server instead of BitBucket, either via SSH or via a shared directory. An example for an SSH URL with Mercurial is be ssh://user@example.com/path/to/repo. When using a shared directory you just push as if the repository in the shared directory were on your local drive.
Summary
Now let's take a step back and look where we are.
With the commands you already know, a bit reading of hg help <command> and some evil script-fu you can already do almost everything you'll ever need to do when working with source code history. So from now on almost everything is convenience, and that's a good thing.
First this is good, because it means, that you can now use most of the concepts which are utilized in more complex workflows.
Second it aids you, because convenience lets you focus on your task instead of focusing on your tool. It helps you concentrate on the coding itself. Still you can always go back to the basics, if you want to.
A short summary of what you can do which can also act as a short check, if you still remember the meaning of the commands.
create a project
$ hg init project
$ cd project
$ (add some files)
$ hg add
$ hg commit
(enter the commit message)
do nonlinear development
$ (do some changes)
$ hg commit
(enter the commit message)
$ hg update 0
$ (do some changes)
$ hg commit
(enter the commit message)
$ hg merge
$ (optionally hg resolve)
$ hg commit
(enter the commit message)
use feature clones
$ cd ..
$ hg clone project feature1
$ cd feature1
$ (do some changes)
$ hg commit
(enter the commit message)
$ cd ../project
$ hg pull ../feature1
share your repository via the integrated webserver
$ hg serve &
$ cd ..
$ hg clone http://127.0.0.1:8000 project-clone
export changes to files
$ cd project-clone
$ (do some changes)
$ hg commit
(enter the commit message)
$ hg export tip > ../changes.diff
import changes from files
$ cd ../project
$ hg import ../changes.diff
pull changes from a served repository (hg serve still runs on project)
$ cd ../feature1
$ hg pull http://127.0.0.1:8000
Use shared repositories on BitBucket
$ (setup bitbucket repo)
$ hg push https://bitbucket.org/USER/REPO
(enter name and password in the prompt)
$ hg pull https://bitbucket.org/USER/REPO
Let's move on towards useful features and a bit more advanced workflows.
Advanced workflows
Backing out bad revisions
Use Case
When you routinely pull code from others, it can happen that you overlook some bad change. As soon as others pull that change from you, you have little chance to get completely rid of it.
To resolve that problem, Mercurial offers you the backout command. Backing out a change means, that you tell Mercurial to create a commit which reverses the bad change. That way you don't get rid of the bad code in history, but you can remove it from new revisions.
Note:
The basic commands don't directly rewrite history. If you want to do that, you need to activate some of the extensions which are shipped with mercurial. We'll come to that later on.
Workflow
Let's assume the bad change was revision 3, and you already have one more revision in your
repository. To remove the bad code, you can just backout of it. This creates a new
change which reverses the bad change. After backing out, you can then merge that new change
into the current code.
$ hg backout 3
$ hg merge
(potentially resolve conflicts)
$ hg commit
(enter commit message. For example: "merged backout")
That's it. You reversed the bad change. It's still recorded that it was once there (following the principle "don't rewrite history, if it's not really necessary"), but it doesn't affect future code anymore.
Collaborative feature development
Now that you can share changes and reverse them if necessary, you can go one step further: Using Mercurial to help in coordinating the coding.
The first part is an easy way to develop features together, without requiring every developer to keep track of several feature clones.
Use Case
When you want to split your development into several features, you need to keep track of who works on which feature and where to get which changes.
Mercurial makes this easy for you by providing named branches. They are a part of the main repository, so they are available to everyone involved. At the same time, changes committed on a certain branch don't get mixed with the changes in the default branch, so features are kept separate, until they get merged into the default branch.
Note:
Cloning a repository always puts you onto the default branch at first.
Workflow
When someone in your group wants to start coding on a feature without disturbing the others, he can create a named branch and commit there. When someone else wants to join in, he just updates to the branch and commits away. As soon as the feature is finished, someone merges the named branch into the default branch.
Working in a named branch
Create the branch
$ hg branch feature1
(do some changes)
$ hg commit
(write commit message)
Update into the branch and work in it
$ hg update feature1
(do some changes)
$ hg commit
(write commit message)
Now you can commit, pull, push and merge (and anything else) as if you were working in a separate repository. If the history of the named branch is linear and you call "hg merge", Mercurial asks you to specify an explicit revision, since the branch in which you work doesn't have anything to merge.
Merge the named branch
When you finished the feature, you merge the branch back into the default branch.
$ hg update default
$ hg merge feature1
$ hg commit
(write commit message)
And that's it. Now you can easily keep features separate without unnecessary bookkeeping.
Note:
Named branches stay in history as permanent record after you finished your work. If you don't like having that record in your history, please have a look at some of the advanced workflows.
Tagging revisions
Use Case
Since you can now code separate features more easily, you might want to mark certain revisions as fit for consumption (or similar). For example you might want to mark releases, or just mark off revisions as reviewed.
For this Mercurial offers tags. Tags add a name to a revision and are part of the history. You can tag a change years after it was committed. The tag includes the information when it was added, and tags can be pulled, pushed and merged just like any other committed change.
Note:
A tag must not contain the char ":", since that char is used for specifying multiple revisions - see "hg help revisions".
Note:
To securely mark a revision, you can use the gpg extension to sign the tag.
Workflow
Let's assume you want to give revision 3 the name "v0.1".
Add the tag
$ hg tag -r 3 v0.1
See all tags
$ hg tags
When you look at the log you'll now see a line in changeset 3 which marks the Tag. If someone wants to update to the tagged revision, he can just use the name of your tag
$ hg update v0.1
Now he'll be at the tagged revision and can work from there.
Removing history
Use Case
At times you will have changes in your repository, which you really don't want in it.
There are many advanced options for removing these, and most of them use great extensions (Mercurial Queues is the most often used one), but in this basic guide, we'll solve the problem with just the commands we already learned. But we'll use an option to clone which we didn't yet use.
This workflow becomes inconvenient when you need to remove changes, which are buried below many new changes. If you spot the bad changes early enough, you can get rid of them without too much effort, though.
Workflow
Let's assume you want to get rid of revision 2 and the highest revision is 3.
The first step is to use the "--rev" option to clone: Create a clone which only contains the changes up to the specified revision. Since you want to keep revision 1, you only clone up to that
$ hg clone -r 1 project stripped
Now you can export the change 3 from the original repository (project) and import it into the stripped one
$ cd project
$ hg export 3 > ../changes.diff
$ cd ../stripped
$ hg import ../changes.diff
If a part of the changes couldn't be applied, you'll see that part in *.rej files. If you have *.rej files, you'll have to include or discard changes by hand
$ cat *.rej
(apply changes by hand)
$ hg commit
(write commit message)
That's it. hg export also includes the commit message, date, committer and similar metadata, so you are already done.
Note:
removing history will change the revision IDs of revisions after the removed one, and if you pull from someone else who still has the revision you removed, you will pull the removed parts again. That's why rewriting history should most times only be done for changes which you didn't yet publicise.
Summary
So now you can work with Mercurial in private, and also share your changes in a multitude of ways.
Additionally you can remove bad changes, either by creating a change in the repository which reverses the original change, or by really rewriting history, so it looks like the change never occurred.
And you can separate the work on features in a single repository by using named branches and add tags to revisions which are visible markers for others and can be used to update to the tagged revisions.
With this we can conclude our practical guide.
More Complex Workflows
If you now want to check some more complex workflows, please have a look at the general workflows wikipage.
To deepen your understanding, you should also check the basic concept overview.
Have fun with Mercurial!
License
Learning Mercurial in Workflows - A practical guide to version tracking / source code management with Mercurial
Copyright © 2011 Arne Babenhauserheide (main author), David Soria Parra, Augie Fackler, Benoit Boissinot, Adrian Buehlmann, Nicolas Dumazet and Steve Losh.
This program is free software; you can redistribute it and/or modify it under the terms of the GNU General Public License as published by the Free Software Foundation; either version 2 of the License, or (at your option) any later version.
This program is distributed in the hope that it will be useful, but WITHOUT ANY WARRANTY; without even the implied warranty of MERCHANTABILITY or FITNESS FOR A PARTICULAR PURPOSE. See the GNU General Public License for more details.
You should have received a copy of the GNU General Public License along with this program; if not, write to the Free Software Foundation, Inc., 51 Franklin Street, Fifth Floor, Boston, MA 02110-1301, USA.
Mercurial Workflow: Feature seperation via named branches
Also published on Mercurials Workflows wikipage. Originally written for PyHurd: Python bindings for the GNU Hurd.
For Whom?
If you
- want to develop features collaboratively and you want to be able to see later for which feature a given change was added or
- want to do changes concurrently which would likely affect each other negatively while they are not finished, but which need to be developed in a group with minimal overhead,
then this workflow might be right for you.
Note: If you have a huge number of small features (2000 and upwards), the number of persistent named branches can create some performance problems for listing the branches (only for the listing!) (as different example, pushing is unaffected: Linear history is just as fast as 2000 branches). For features which need no collaboration or need only a few commits, this workflow also has much unnecessary overhead. It is best used for features which will be developed side by side with default for some time (and many commits), so tracking the default branch against the feature is relevant. To mark single-commit features as belonging to a feature, just use the commit message.
Note: The difference between Mercurial named branches and git branches is that git branches don’t stay in history. They don’t allow you to find out later in which branch a certain commit was added. If you want git-style branching, just use bookmarks.
Note: If you avoid using stable as branch name, you can always upgrade this workflow to the complete branching model later on.
What you need
Just vanilla Mercurial.
Workflow
The workflow is 6-stepped:
- create the new feature,
- Implement and share,
- merge other changes into it,
- merge stable features,
- close finished features and
- reopen features.
Let’s see the steps in detail.
1. New feature
First start a new branch with the name of the feature (starting from default).
hg branch feature-x
\# do some changes
hg commit -m "Started implemented feature-x"
2. Implement and share
Then commit away and push whenever you finish something which might be of interest to others, regardless how marginal.
You can push to a shared repository, or to your own clone or even send the changes via email to other contributors (for example via the mailbomb extension).
3. Merge in default
Merge changes in the default branch into your feature as often as possible to reduce the work necessary when you want to merge the feature later on.
hg update feature-x
hg merge default
hg commit -m "merged default into feature-x"
4. Merge stable features
When your feature is stable, merge it into default.
hg update default
hg merge feature-x
hg commit -m "merged feature-x"
5. Close the branch when it’s done
And when the feature needs no more work, close the branch.
\# start from default, automatic when using a fresh clone
hg update default
hg branch feature-x
\# do some changes
hg commit -m "started feature X"
hg push
\# commit and push as you like
hg update default
hg merge feature-x
hg ci -m "merged feature X into default"
hg commit --close-branch -m "finished feature X"
This hides the branch from the output of hg branches, so you don’t clutter your history.
6. Reopen the feature
To improve a feature after it was officially closed, first merge default into the feature branch (to get it up to date), then work just as if you had started it.
hg up feature-x
hg merge default
hg ci -m "merged default into feature X"
\# commit, push, repeat, finish
Generally merge default into your feature as often as possible.
Epilog
If this workflow helps you, I’d be glad to hear from you!
For a more extensive project-workflow, have a look at the Complete Mercurial Branching Strategy. It extends the feature branches workflow to account for release cycles.
Mercurial for two Programmers who are (mostly) new to SCM
Written in the Mercurial mailing list
Hi Bernard,
Am Dienstag 03 Februar 2009 20:19:14 schrieb ... ...:
> Most of the docs I can find seem to assume the reader is familiar with
> existing software developemnt tools and methodologies.
>
> This is not the case for me.
It wasn't for me either, and I can assure you that using Mercurial becomes
natural quite quickly.
> Now, I need to coordinate with a second (also SCM clueless) programmer.
...
> I envision us both working the main trunk for many small day-to-day
> changes, and our own isolated repo for larger additions that we will each
> be working on.
I don't know about a HOWTO, but I can give you a short description about basic
usage and the workflow I'd use:
Basic usage
- Just commit as you'd have done in SVN via "hg commit".
- To get changes from others, do "hg pull -u".
The "-u" says 'update my files'. Always commit before you pull. Otherwise "hg pull -u" will try to merge the new changes. - If you already committed and then pull changes from someone else, you merge
the changes with yours via "hg merge". Merging is quite painless in Mercurial, so you can easily do it often. - Once you want to share your changes, do "hg push".
Should that complain about "adding heads", pull and merge, then do the push again. If you really want to create new remote heads, you can use "hg push -f".
Workflow
- Firstoff: Create a main repository you both can push changes to. If you have ssh access to a shared machine, that's as simple as creating a repository on that machine via "hg init project".
- Now both of you clone from that repository via
hg clone ssh://USER@ADDRESS:path/to/project project(ADDRESS can be either a host or an IP).
That's your repository for the small day to day changes.
- If you want to do bigger changes, you create a feature clone via
hg clone project feature1In that clone you simply work, pull and commit as usual, but you only push after you finished the feature.
Once you finished the feature, you push the changes from the feature clone via "hg push" in feature1 (which gets them into your main working clone) and then push then onward into the shared repository.
That's it - or rather that's what I'd do. It might be right for you, too, and
if it isn't, don't be shy of experimenting. As long as you have a backup clone
lying around (for example cloned to a USB stick via "hg clone project
path/to/stick/project"), you can't do too much damage :)
I hope I could provide a bit of help :)
Renaming a Mercurial branch with the evolve extension
Short version (rename from $OLD to $NEW):
ROOT="$(hg id -qr 'first(roots(branch('$OLD')))')"
MSG="$(hg log -r $ROOT -T '{desc}')"

hg update $ROOT
hg branch $NEW
hg commit --amend -m "$MSG"
hg evolve --all
Mercurial records in which named branch a commit was created. This can be inconvenient when you choose temporary branch names like "foo" or "justworkdamnit".
The evolve extension enables safe, collaborative history editing which removes this inconvenience while preserving the reliability guarantees of Mercurial.
Here I show in a quick example how to rename a branch in Mercurial using the evolve extension.
You can use this method for all changes which you did not transfer elsewhere yet (they must be in draft or secret phase).
Note (2016): The evolve extension is still in testing. Do not use it for production yet. If you want to help stabilizing it, please join evolve-testers. I’ve been using it for more than a year, but I know how to fix things when I hit a bug in the evolve extension.
Setup evolve
hg clone https://www.mercurial-scm.org/repo/evolve/ ~/.local/share/hgext-evolve
echo "[extensions]
evolve = ~/.local/share/hgext-evolve/hgext/evolve.py" >> ~/.hgrc
Rename a branch
create repo with wrong branch name
hg init foo
cd foo
echo 1 > 1
hg ci -Am 1
echo stable > 1
hg branch stapling
hg ci -m stable
# add a second commit to the branch
# to make this non-trivial
echo stable2 > 1
hg ci -m stable2
change the branch name
# amend the first revision in the branch
hg up -r "first(branch(stapling))"
hg branch stable
hg ci --amend -m stable
# (notes that there is an unstable changeset)
# evolve the history
hg evolve
and check that it’s correct
hg log -G
That’s it.
Result
@  changeset:   5:1822f3b02b72
|  branch:      stable
|  tag:         tip
|  user:        Freenet
|  date:        Fri Nov 18 00:56:57 2016 +0100
|  summary:     stable2
|
o  changeset:   4:d47764612e1a
|  branch:      stable
|  parent:      0:d2b5bb69b11b
|  user:        Freenet
|  date:        Fri Nov 18 00:56:56 2016 +0100
|  summary:     stable
|
o  changeset:   0:d2b5bb69b11b
   user:        Freenet
   date:        Fri Nov 18 00:56:55 2016 +0100
   summary:     1
☺ Yay! ☺
Happy Hacking!
PS: If you want to share this: Short on GNU social
PPS: If you want to tweet this:
hg branch name O→N
— ((λ()'ArneBab)) (@ArneBab) November 18, 2016
I="$(hg id -qr 'first(branch('$O'))')"
M="$(hg log -r $I -T' {desc}')"
hg up $I
hg branch $N
hg ci --amend -m "$M"
hg ev
PPPS: For efficient collaboration via Mercurial see the complete branching strategy.
Test of the hg evolve extension for easier upstreaming
1 Rationale
Currently I rework my code extensively before I push it into upstream SVN. Some of that is inconvenient and it would be nicer to have easy to use refactoring tools.
hg evolve might offer that.
This test uses the mutable-hg extension in revision c70a1091e0d8 (24 changesets after 2.1.0). It will likely be obsolete, soon, since mutable-hg is currently moved into Mercurial core by Pierre-Yves David, its main developer. I hope it will be useful for you, to assess the future possibilities of Mercurial today. This is not (only) a pun on “obsolete”, the functionality at the core of evolve which allows safe, collaborative history rewriting ☺
Table of Contents
2 Tests
# Tests for refactoring history with the evolve extension
export LANG=C # to get rid of localized strings
export PS1="$ "
rm -r testmy testother testpublic
2.1 Init
Initialize the repos I need for the test.
We have one public repo and 2 nonpublishing repos.
# Initialize the test repo
hg init testpublic # a public repo
hg init testmy # my repo
hg init testother # other repo
# make the two private repos nonpublishing
for i in my other
  do echo "[ui]
username = $i
[phases]
publish = False" > test${i}/.hg/hgrc
done
note: it would be nice if we could just specify nonpublishing with the init command.
2.2 Prepare
Prepare the content of the repos.
cd testmy
echo "Hello World" > hello.txt
hg ci -Am "Hello World"
hg log -G
cd ..
adding hello.txt
@  changeset:   0:c19ed5b17f4f
   tag:         tip
   user:        my
   date:        Sat Jan 12 00:17:40 2013 +0100
   summary:     Hello World
2.3 Amend
Add a bad change and amend it.
cd testmy
sed -i s/World/Evoluton/ hello.txt
hg ci -m "Hello Evolution"
echo
hg log -G
cat hello.txt
# FIX this up
sed -i s/Evoluton/Evolution/ hello.txt
hg amend -m "Hello Evolution" # pass the message explicitely again to avoid having the editor pop up
echo
hg log -G
cd ..
@  changeset:   1:83a5e89adea6
|  tag:         tip
|  user:        my
|  date:        Sat Jan 12 00:17:41 2013 +0100
|  summary:     Hello Evolution
|
o  changeset:   0:c19ed5b17f4f
   user:        my
   date:        Sat Jan 12 00:17:40 2013 +0100
   summary:     Hello World
Hello Evoluton

@  changeset:   3:129d59901401
|  tag:         tip
|  parent:      0:c19ed5b17f4f
|  user:        my
|  date:        Sat Jan 12 00:17:42 2013 +0100
|  summary:     Hello Evolution
|
o  changeset:   0:c19ed5b17f4f
   user:        my
   date:        Sat Jan 12 00:17:40 2013 +0100
   summary:     Hello World
2.4 …together
Add a bad change. Followed by a good change. Pull both into another repo and amend it. Do a good change in the other repo. Then amend the bad change in the original repo, pull it into the other and evolve.
2.4.1 Setup
Now we change the format to planning a roleplaying session to have a more complex task. We want to present this as coherent story on how to plan a story, so we want clean history.
First I do my own change.
cd testmy
# Now we add the bad change
echo "Wishes:
- The Solek wants Action
- The Judicator wants Action

" >> plan.txt
hg ci -Am "What the players want"
# show what we did
echo
hg log -G -r tip
# and the good change
echo "Places:
- The village
- The researchers cave
" >> plan.txt
hg ci -m "The places"
echo
hg log -G -r 1:
cd ..
  adding plan.txt

@  changeset:   4:b170dda0a4a7
|  tag:         tip
|  user:        my
|  date:        Sat Jan 12 00:17:44 2013 +0100
|  summary:     What the players want
|

@  changeset:   5:2a37053027cc
|  tag:         tip
|  user:        my
|  date:        Sat Jan 12 00:17:45 2013 +0100
|  summary:     The places
|
o  changeset:   4:b170dda0a4a7
|  user:        my
|  date:        Sat Jan 12 00:17:44 2013 +0100
|  summary:     What the players want
|
o  changeset:   3:129d59901401
|  parent:      0:c19ed5b17f4f
|  user:        my
|  date:        Sat Jan 12 00:17:42 2013 +0100
|  summary:     Hello Evolution
|
Now my file contains the wishes of the players as well as the places.
We pull the changes into the repo of another gamemaster with whom we plan this game.
hg -R testother pull -u testmy
hg -R testother log -G -r 1:
pulling from testmy
requesting all changes
adding changesets
adding manifests
adding file changes
added 4 changesets with 4 changes to 2 files
2 files updated, 0 files merged, 0 files removed, 0 files unresolved
@  changeset:   3:2a37053027cc
|  tag:         tip
|  user:        my
|  date:        Sat Jan 12 00:17:45 2013 +0100
|  summary:     The places
|
o  changeset:   2:b170dda0a4a7
|  user:        my
|  date:        Sat Jan 12 00:17:44 2013 +0100
|  summary:     What the players want
|
o  changeset:   1:129d59901401
|  user:        my
|  date:        Sat Jan 12 00:17:42 2013 +0100
|  summary:     Hello Evolution
|
note: the revisions numbers are different because the other repo only gets those obsolete revisions which are ancestors to non-obsolete revisions. That way evolve slowly cleans out obsolete revisions from the history without breaking repositories which already have them (but giving them a clear and easy path for evolution).
He then adds the important people:
cd testother
echo "People:
- The Lost
- The Specter
" >> plan.txt
hg ci -m "The people"
echo
hg log -G -r 1:
cd ..
@  changeset:   4:65cc97fc774a
|  tag:         tip
|  user:        other
|  date:        Sat Jan 12 00:17:48 2013 +0100
|  summary:     The people
|
o  changeset:   3:2a37053027cc
|  user:        my
|  date:        Sat Jan 12 00:17:45 2013 +0100
|  summary:     The places
|
o  changeset:   2:b170dda0a4a7
|  user:        my
|  date:        Sat Jan 12 00:17:44 2013 +0100
|  summary:     What the players want
|
o  changeset:   1:129d59901401
|  user:        my
|  date:        Sat Jan 12 00:17:42 2013 +0100
|  summary:     Hello Evolution
|
2.4.2 Fix my side
And I realize too late, that my estimate of the wishes of the players was wrong. So I simply amend it.
cd testmy
hg up -r -2
sed -i "s/The Solek wants Action/The Solek wants emotionally intense situations/" plan.txt
hg amend -m "The wishes of the players"
hg log -G -r 1:
cd ..
1 files updated, 0 files merged, 0 files removed, 0 files unresolved
1 new unstable changesets
@  changeset:   7:86e7a5305c9e
|  tag:         tip
|  parent:      3:129d59901401
|  user:        my
|  date:        Sat Jan 12 00:17:50 2013 +0100
|  summary:     The wishes of the players
|
| o  changeset:   5:2a37053027cc
| |  user:        my
| |  date:        Sat Jan 12 00:17:45 2013 +0100
| |  summary:     The places
| |
| x  changeset:   4:b170dda0a4a7
|/   user:        my
|    date:        Sat Jan 12 00:17:44 2013 +0100
|    summary:     What the players want
|
o  changeset:   3:129d59901401
|  parent:      0:c19ed5b17f4f
|  user:        my
|  date:        Sat Jan 12 00:17:42 2013 +0100
|  summary:     Hello Evolution
|
Now I amended my commit, but my history does not look good, yet. Actually it looks evil, since I have 2 heads, which is not so nice. The changeset under which we just pulled away the bad change has become unstable, because its ancestor has been obsoleted, so it has no stable foothold anymore. In other DVCSs, this means that we as users have to find out what was changed and fix it ourselves.
Changeset evolution allows us to evolve our repository to get rid of dependencies on obsolete changes.
cd testmy
hg evolve
hg log -G -r 1:
cd ..
move:[5] The places
atop:[7] The wishes of the players
merging plan.txt
@  changeset:   8:0980732d20e0
|  tag:         tip
|  user:        my
|  date:        Sat Jan 12 00:17:45 2013 +0100
|  summary:     The places
|
o  changeset:   7:86e7a5305c9e
|  parent:      3:129d59901401
|  user:        my
|  date:        Sat Jan 12 00:17:50 2013 +0100
|  summary:     The wishes of the players
|
o  changeset:   3:129d59901401
|  parent:      0:c19ed5b17f4f
|  user:        my
|  date:        Sat Jan 12 00:17:42 2013 +0100
|  summary:     Hello Evolution
|
Now I have nice looking history without any hassle - and without having to resort to low-level commands.
2.4.3 Be a nice neighbor
But I rewrote history. What happens if my collegue pulls this?
hg -R testother pull testmy
hg -R testother log -G
pulling from testmy
searching for changes
adding changesets
adding manifests
adding file changes
added 2 changesets with 2 changes to 1 files (+1 heads)
(run 'hg heads' to see heads, 'hg merge' to merge)
1 new unstable changesets
o  changeset:   6:0980732d20e0
|  tag:         tip
|  user:        my
|  date:        Sat Jan 12 00:17:45 2013 +0100
|  summary:     The places
|
o  changeset:   5:86e7a5305c9e
|  parent:      1:129d59901401
|  user:        my
|  date:        Sat Jan 12 00:17:50 2013 +0100
|  summary:     The wishes of the players
|
| @  changeset:   4:65cc97fc774a
| |  user:        other
| |  date:        Sat Jan 12 00:17:48 2013 +0100
| |  summary:     The people
| |
| x  changeset:   3:2a37053027cc
| |  user:        my
| |  date:        Sat Jan 12 00:17:45 2013 +0100
| |  summary:     The places
| |
| x  changeset:   2:b170dda0a4a7
|/   user:        my
|    date:        Sat Jan 12 00:17:44 2013 +0100
|    summary:     What the players want
|
o  changeset:   1:129d59901401
|  user:        my
|  date:        Sat Jan 12 00:17:42 2013 +0100
|  summary:     Hello Evolution
|
o  changeset:   0:c19ed5b17f4f
   user:        my
   date:        Sat Jan 12 00:17:40 2013 +0100
   summary:     Hello World
As you can see, he is told that his changes became unstable, since they depend on obsolete history. No need to panic: He can just evolve his repo to be state of the art again.
But the unstable change is the current working directory, so evolve does not change it. Instead it tells us, that we might want to call it with `–any`. And as it is the case with most hints in hg, that is actually the case.
hg -R testother evolve
nothing to evolve here
(1 troubled changesets, do you want --any ?)
note: that message might be a candidate for cleanup.
hg -R testother evolve --any
hg -R testother log -G -r 1:
move:[4] The people
atop:[6] The places
merging plan.txt
@  changeset:   7:058175606243
|  tag:         tip
|  user:        other
|  date:        Sat Jan 12 00:17:48 2013 +0100
|  summary:     The people
|
o  changeset:   6:0980732d20e0
|  user:        my
|  date:        Sat Jan 12 00:17:45 2013 +0100
|  summary:     The places
|
o  changeset:   5:86e7a5305c9e
|  parent:      1:129d59901401
|  user:        my
|  date:        Sat Jan 12 00:17:50 2013 +0100
|  summary:     The wishes of the players
|
o  changeset:   1:129d59901401
|  user:        my
|  date:        Sat Jan 12 00:17:42 2013 +0100
|  summary:     Hello Evolution
|
And as you can see, everything looks nice again.
2.5 …safely
Publishing the changes into a public repo makes them immutable.
Now imagine, that my co-gamemaster publishes his work. Mercurial will then store that his changes were published and warn us, if we try to change them.
cd testother
hg up > /dev/null
echo "current phase"
hg phase .
hg push ../testpublic
echo "phase after publishing"
hg phase .
cd ..
current phase
7: draft
pushing to ../testpublic
searching for changes
adding changesets
adding manifests
adding file changes
added 5 changesets with 5 changes to 2 files
phase after publishing
7: public
Now trying to amend history will fail (except if we first change the phase to draft with `hg phase –force –draft .`).
cd testother
hg amend -m "change published history"
# change to draft
hg phase -fd .
hg phase .
# now we could amend, but that would defeat the point of this section, so we go to public again.
hg phase -p .
cd ..
abort: can not rewrite immutable changeset 058175606243
7: draft
Once I pull from that repo, the revisions which are in there will also switch phase to public in my repo.
So by pushing the changes into a publishing repo, you can get the Mercurial of all contributors to track which revisions are safe to change - and which are not. An alternative is using `hg phase -p REV`.
2.6 Fold
Do multiple commits to create a patch, then fold them into one commit.
Now I go into a bit of a planning spree.
cd testmy
echo "Scenes:" >> plan.txt
hg ci -m "we need scenes"

echo "- Lost appears" >> plan.txt
hg ci -m "scene"
echo "- People vanish" >> plan.txt
hg ci -m "scene"
echo "- Portals during dreamtime" >> plan.txt
hg ci -m "scene"
echo
hg log -G -r 9:
cd ..
@  changeset:   12:fbcce7ad7369
|  tag:         tip
|  user:        my
|  date:        Sat Jan 12 00:18:06 2013 +0100
|  summary:     scene
|
o  changeset:   11:189c0362a80f
|  user:        my
|  date:        Sat Jan 12 00:18:05 2013 +0100
|  summary:     scene
|
o  changeset:   10:715a31ac9dee
|  user:        my
|  date:        Sat Jan 12 00:18:05 2013 +0100
|  summary:     scene
|
o  changeset:   9:dfa4c226150b
|  user:        my
|  date:        Sat Jan 12 00:18:05 2013 +0100
|  summary:     we need scenes
|
Yes, I tend to do that…
But we actually only need one change, so make it one by folding the last 4 changes changes into a single commit.
Since fold needs an interactive editor (it does not take -m, yet), we will leave that out. The commented commands allow you to fold the changesets.
cd testmy
# hg fold -r "-1:-4"
# hg log -G -r 9:
cd ..
2.7 Split
Do one big commit, then split it into two atomic commits.
Now I apply the scenes to wishes, places and people. Which is not useful: First I should apply them to the wishes and check if all wishes are fullfilled. But while writing I forgot that, and anxious to show my co-gamemaster, I just did one big commit.
cd testmy
sed -i "s/The Judicator wants Action/The Judicator wants Action - portals/" plan.txt
sed -i "s/The village/The village - lost, vanish, portals/" plan.txt
hg ci -m "Apply Scenes to people and places."
echo
hg log -G -r 12:
cd ..
@  changeset:   13:5c83a3540c37
|  tag:         tip
|  user:        my
|  date:        Sat Jan 12 00:18:10 2013 +0100
|  summary:     Apply Scenes to people and places.
|
o  changeset:   12:fbcce7ad7369
|  user:        my
|  date:        Sat Jan 12 00:18:06 2013 +0100
|  summary:     scene
|
Let’s fix that: uncommit it and commit it as separate changes. Normally I would just use `hg record` to interactively select changes to record. Since this is a non-interactive test, I manually undo and redo changes instead.
cd testmy
hg uncommit --all # to undo all changes, not just those for specified files
hg diff
sed -i "s/The village - lost, vanish, portals/The village/" plan.txt
hg amend -m "Apply scenes to wishes"
sed -i "s/The village/The village - lost, vanish, portals/" plan.txt
hg commit -m "Apply scenes to places"
echo
hg log -G -r 12:
cd ..
new changeset is empty
(use "hg kill ." to remove it)
diff --git a/plan.txt b/plan.txt
--- a/plan.txt
+++ b/plan.txt
@@ -1,10 +1,10 @@
 Wishes:
 - The Solek wants emotionally intense situations
-- The Judicator wants Action
+- The Judicator wants Action - portals


 Places:
-- The village
+- The village - lost, vanish, portals
 - The researchers cave

 Scenes:

@  changeset:   17:f8cc86f681ac
|  tag:         tip
|  user:        my
|  date:        Sat Jan 12 00:18:13 2013 +0100
|  summary:     Apply scenes to places
|
o  changeset:   16:6c8918a352e2
|  parent:      12:fbcce7ad7369
|  user:        my
|  date:        Sat Jan 12 00:18:12 2013 +0100
|  summary:     Apply scenes to wishes
|
o  changeset:   12:fbcce7ad7369
|  user:        my
|  date:        Sat Jan 12 00:18:06 2013 +0100
|  summary:     scene
|
2.8 …as afterthought
Do one big commit, add an atomic commit. Then split the big commit.
Let’s get the changes from our co-gamemaster and apply people to wishes, places and scenes. Then add a scene we need to fullfill the wishes and clean the commits afterwards.
First get the changes:
cd testmy
hg pull ../testother
hg merge  --tool internal:merge tip # the new head from our co-gamemaster
# fix the conflicts
sed -i "s/<<<.*local//" plan.txt
sed -i "s/====.*/\n/" plan.txt
sed -i "s/>>>.*other//" plan.txt
# mark them as solved.
hg resolve -m
hg commit -m "merge people"
echo
hg log -G -r 12:
cd ..
pulling from ../testother
searching for changes
adding changesets
adding manifests
adding file changes
added 1 changesets with 1 changes to 1 files (+1 heads)
(run 'hg heads .' to see heads, 'hg merge' to merge)
merging plan.txt
warning: conflicts during merge.
merging plan.txt incomplete! (edit conflicts, then use 'hg resolve --mark')
0 files updated, 0 files merged, 0 files removed, 1 files unresolved
use 'hg resolve' to retry unresolved file merges or 'hg update -C .' to abandon

@    changeset:   19:8bf8d55739fa
|\   tag:         tip
| |  parent:      17:f8cc86f681ac
| |  parent:      18:058175606243
| |  user:        my
| |  date:        Sat Jan 12 00:18:16 2013 +0100
| |  summary:     merge people
| |
| o  changeset:   18:058175606243
| |  parent:      8:0980732d20e0
| |  user:        other
| |  date:        Sat Jan 12 00:17:48 2013 +0100
| |  summary:     The people
| |
o |  changeset:   17:f8cc86f681ac
| |  user:        my
| |  date:        Sat Jan 12 00:18:13 2013 +0100
| |  summary:     Apply scenes to places
| |
o |  changeset:   16:6c8918a352e2
| |  parent:      12:fbcce7ad7369
| |  user:        my
| |  date:        Sat Jan 12 00:18:12 2013 +0100
| |  summary:     Apply scenes to wishes
| |
o |  changeset:   12:fbcce7ad7369
| |  user:        my
| |  date:        Sat Jan 12 00:18:06 2013 +0100
| |  summary:     scene
| |
Now we have all changes in our repo. We begin to apply people to wishes, places and scenes.
cd testmy
sed -i "s/The Solek wants emotionally intense situations/The Solek wants emotionally intense situations | specter, Lost/" plan.txt
sed -i "s/Lost appears/Lost appears | Lost/" plan.txt
sed -i "s/People vanish/People vanish | Specter/" plan.txt
hg commit -m "apply people to wishes, places and scenes"
echo
hg log -G -r 19:
cat plan.txt
cd ..
@  changeset:   20:c00aa6f24c3f
|  tag:         tip
|  user:        my
|  date:        Sat Jan 12 00:18:18 2013 +0100
|  summary:     apply people to wishes, places and scenes
|
o    changeset:   19:8bf8d55739fa
|\   parent:      17:f8cc86f681ac
| |  parent:      18:058175606243
| |  user:        my
| |  date:        Sat Jan 12 00:18:16 2013 +0100
| |  summary:     merge people
| |
Wishes:
- The Solek wants emotionally intense situations | specter, Lost
- The Judicator wants Action - portals


Places:
- The village - lost, vanish, portals
- The researchers cave


Scenes:
- Lost appears | Lost
- People vanish | Specter
- Portals during dreamtime


People:
- The Lost
- The Specter
As you can see, the specter only applies to the wishes, and we miss a person for the action.
Let’s fix that.
cd testmy
sed -i "s/- The Specter/- The Specter\n- Wild Memories/" plan.txt
sed -i "s/- Portals during dreamtime/- Portals during dreamtime\n- Unconnected Memories/" plan.txt
hg ci -m "Added wild memories to fullfill the wish for action"
echo
hg log -G -r 19:
cd ..
@  changeset:   21:5393327d2d3f
|  tag:         tip
|  user:        my
|  date:        Sat Jan 12 00:18:20 2013 +0100
|  summary:     Added wild memories to fullfill the wish for action
|
o  changeset:   20:c00aa6f24c3f
|  user:        my
|  date:        Sat Jan 12 00:18:18 2013 +0100
|  summary:     apply people to wishes, places and scenes
|
o    changeset:   19:8bf8d55739fa
|\   parent:      17:f8cc86f681ac
| |  parent:      18:058175606243
| |  user:        my
| |  date:        Sat Jan 12 00:18:16 2013 +0100
| |  summary:     merge people
| |
Now split the big change into applying people first to wishes, then to places and scenes.
cd testmy
# go back to the big change
hg up -r -2
# uncommit it
hg uncommit --all
# Now rework it into two commits
sed -i "s/- Lost appears | Lost/- Lost appears/" plan.txt
sed -i "s/- People vanish | Specter/- People vanish/" plan.txt
hg amend -m "Apply people to wishes"
sed -i "s/- Lost appears/- Lost appears | Lost/" plan.txt
sed -i "s/- People vanish/- People vanish | Specter/" plan.txt
hg commit -m "Apply people to scenes"
# let’s mark this for later use
hg book splitchanges
# and evolve to get rid of the obsoletes
echo
hg evolve --any
hg log -G -r 19:
cd ..
1 files updated, 0 files merged, 0 files removed, 0 files unresolved
new changeset is empty
(use "hg kill ." to remove it)
1 new unstable changesets

move:[21] Added wild memories to fullfill the wish for action
atop:[24] Apply people to wishes
merging plan.txt
@  changeset:   26:ab48ecaceb01
|  tag:         tip
|  parent:      24:909bb640d4fc
|  user:        my
|  date:        Sat Jan 12 00:18:20 2013 +0100
|  summary:     Added wild memories to fullfill the wish for action
|
| o  changeset:   25:76083662b263
|/   bookmark:    splitchanges
|    user:        my
|    date:        Sat Jan 12 00:18:23 2013 +0100
|    summary:     Apply people to scenes
|
o  changeset:   24:909bb640d4fc
|  parent:      19:8bf8d55739fa
|  user:        my
|  date:        Sat Jan 12 00:18:23 2013 +0100
|  summary:     Apply people to wishes
|
o    changeset:   19:8bf8d55739fa
|\   parent:      17:f8cc86f681ac
| |  parent:      18:058175606243
| |  user:        my
| |  date:        Sat Jan 12 00:18:16 2013 +0100
| |  summary:     merge people
| |
You can see the additional commit sticking out. We want to get the history easy to follow, so we just graft the last last change atop the split changes.
note: We seem to have the workdir on the new changeset instead of on the one we did before the evolve. I assume that’s a bug to fix.
cd testmy
hg up splitchanges
hg graft -O tip
hg log -G -r 19:
cd ..
1 files updated, 0 files merged, 0 files removed, 0 files unresolved
grafting revision 26
merging plan.txt
@  changeset:   27:4d3a40c254b4
|  bookmark:    splitchanges
|  tag:         tip
|  parent:      25:76083662b263
|  user:        my
|  date:        Sat Jan 12 00:18:20 2013 +0100
|  summary:     Added wild memories to fullfill the wish for action
|
o  changeset:   25:76083662b263
|  user:        my
|  date:        Sat Jan 12 00:18:23 2013 +0100
|  summary:     Apply people to scenes
|
o  changeset:   24:909bb640d4fc
|  parent:      19:8bf8d55739fa
|  user:        my
|  date:        Sat Jan 12 00:18:23 2013 +0100
|  summary:     Apply people to wishes
|
o    changeset:   19:8bf8d55739fa
|\   parent:      17:f8cc86f681ac
| |  parent:      18:058175606243
| |  user:        my
| |  date:        Sat Jan 12 00:18:16 2013 +0100
| |  summary:     merge people
| |
note: We use graft here, because using a second amend would just change the changeset in between but not add another change. If there had been more changes after the single followup commit, we would simply have called evolve to fix them, because graft -O left an obsolete marker on the grafted changeset, so evolve would have seen how to change all its children.
That’s it. All that’s left is finishing plan.txt, but I’ll rather do that outside this guide :)
3 Conclusion
Evolve does a pretty good job at making it convenient and safe to rework history. If you’re an early adopter, I can advise testing it yourself. Otherwise, it might be better to wait until more early adopters tested it and polished its rough edges.
note: hg amend was subsumed into hg commit –amend, so the dedicated command will likely disappear.
PS: In case you’re interested: The roleplaying session worked out wonderfully and a good deal of our planning actually survived the contact with the players - enough that we could wing the rest with short coordination meetings in which we two game masters enthusiastically told each other what happened in the respective group, planned the next steps and enjoyed the evil gamemasters giggle ☺.note: This guide was created by Arne Babenhauserheide with emacs org-mode and turned to html via M-x org-export-as-html - including results of the evaluation of the code snippets.
| Anhang | Größe |
|---|---|
| hg-evolve-2013-01-12.pdf | 254.54 KB |
| hg-evolve-2013-01-12.org | 13.19 KB |
Track your scientific scripts with Mercurial
If you want to publish your scientific scripts, as Nick Barnes advises in Nature, you can very easily do so with Mercurial.
All my stuff (not just code), excempting only huge datasets, is in a Mercurial source repository.1
Whenever I change something and it does anything new, I commit the files with a simple commit (even if it’s only “it compiles!”).
With that I can always check “which were the last things I did” (look into the log) or “when did I change this line, and why?” (annotate the file). Also I can easily share my scripts folder with others and Mercurial can merge my work and theirs, so if they fix a line and I fix another line, both fixes get integrated without having to manually copy-paste them around.
For all that it doesn’t need much additional expertise: The basics can be learned in just 15 minutes — and you’ll likely never need more than these for your work.2
Update 2013: Nowadays I include the revision of scripts I use in the name of their output files or folders, so I always know which version of my scripts I used to create some result.
-
Mercurial is free software for versiontracking: http://mercurial-scm.org ↩
-
You can use Mercurial in three main ways:
Just use the commandline client (GNU/Linux, Windows, Mac OSX, …). 15 minutes for the basics: http://mercurial-scm.org/guide
Use the graphical interface integrated into the Windows explorer, also callable via hgtk in Unixoid systems: https://tortoisehg.readthedocs.io/en/latest/quick.html
Use a program which integrates Mercurial: http://mercurial-scm.org/wiki/OtherTools
concise commit messages
Written in the discussion about a pull request for Freenet.
When I look up a commit, I’m not searching for prose. I’m searching for short snippets of information I need. If they are long-winded explanations, I am unlikely to even read them.
To understand this, please imagine coming back home, getting off the bike and taking 15 minutes to look at the most recent pull-request. You know that you’ll need to start making dinner at 19:00, so there is no time to waste.
With long winded commit messages that plays out like this:
You look into the pull-request and the explanations are longer than the code changes. You can either read half the explanations or just look at the code. So you try to understand what the code does and what it intends to do from the code alone. After 15 minutes you post a partial review and start cooking. Next slot for code review is tomorrow evening, or maybe next friday. The pull-request lies open for several weeks while more changes pile up.
Contrast that with short commit messages:
You look into the pull-request. The commit message gives you the intention of the change (“sounds good”), maybe with a short note on non-obvious side-effects of the implementation, and you skim the code to see whether it realizes the intention. If it does and you don’t see problems which the writer might have overlooked: Great, code review finished. You write the review and go make dinner. The pull-request is merged the same week.
That’s why I’d suggest to just write short messages and put detailed explanations into a blog. If you like writing those explanations. That’s what you have a blog for, and you can search that later if you need these notes. If they are essential to understand effects of later changes, you might want to document them in a text file like HACKING or docs/devnotes.txt.
The Linux kernel has nice examples of concise commit messages:
Note that the merge commit already almost looks like an entry into a NEWS file using the Perl Changes Format. (If NEWS files cause you merging pain, consider setting a union merge rule.)
workflow concept: automatic trusted group of committers
Goal
A workflow where the repository gets updated only from repositories whose heads got signed by at least a certain percentage or a certain number of trusted committers.
Requirements
Mercurial, two hooks for checking and three special files in the repo.
The hooks do all the work - apart from them, the repo is just a normal Mercurial repository. After cloning it, you only need to setup the hooks to activate the workflow.
Extensions: gpg
Hooks: prechangegroup and pretxnchangegroup
Files: .hgtrustedkeys , .hgbackuprepos , .hgtrustminimum
concept
Hooks
prechangegroup: Copy the local versions of the files for access in the pretxnchangegroup hook (might be unnecessary by letting the pretxnchangegroup hook use the rollback-info).
pretxnchangegroup:
- per head: check if the tipmost non-signature changeset has been GnuPG signed by enough trusted keys.
- If not all heads have enough signatures, rollback, discard the current default repo and replace it with the backup repo which has the most changesets we lack. Continue discarding bad repos until you find one with enough signatures.
Special Files
.hgtrustedkeys contains a list of public GnuPG keys.
.hgbackuprepos contains a list of (pull) links to backup repositories.
.hgtrustminimum contains the percentage or number of keys from which a signature is needed for a head to be accepted.
Notes
With this workflow you can even do automatic updates from the repository. It should be ideal for release repositories of distributed projects.
If you want to work on the project, a very worthwhile goal might be implementing it in infocalypse: anonymous code collaboration via Freenet and Mercurial, built to survive the informational apocalypse (and any kind of censorship).